Creating Tables in WordPress: Everything You Should Know

Data is everywhere! Whether you’re organizing product listings, featuring team members, or highlighting detailed information, WordPress tables are your go-to. They’re the backbone of data visualization- but let’s be honest, sometimes they can feel a bit…basic.
With or without WordPress table plugins, we’ll cover all the bells and whistles on how to create tables in WordPress. Think of it as a complete makeover for your WordPress site, transforming it from dull data dumps into engaging design elements that engage your audience.
Ready to ditch the boring and embrace the beauty? Let’s unlock the full potential of your WordPress tables and turn them into advanced tools that elevate your content and make your website stand out.
How do data tables add value to your website?
Data tables simplify the presentation of the most complex information sets, to say the least. Leveraging the sheer volume of data, numbers, and products can be challenging. Organizing and thoughtfully structuring this data using tables is crucial to get the most out of them. It enhances adaptability, streamlines implementation, and optimizes the decision-making process.
Data tables add elegance and dynamics, giving your website a refined look. This enhances credibility, making your site and storefront more appealing and worth exploring. Also makes your data readable and more organized, helping it stand out from a crowd of random numbers.
People are curious and want to learn more about the facts. When numbers and comparisons are presented in a way that helps them decide quickly, visitors will likely return for more.
What are the common uses of WordPress tables?
In the past, data was organized into grid-like table structures or Excel sheets, making it easy to sum up content. Table layouts remain indispensable for organizing information on WordPress sites. Let’s see some use cases.
- Product Tables: You can include features, specifications, and technical details in a structured product table. Visitors can quickly scan through the table to find the information they need.
| Component | Specification |
|---|---|
| CPU | 800 MHz 1 Core ARM v6 |
| GPU | Adreno 200 |
| Chipset | Qualcomm MSM7227 |
| Memory | 278.34 MB |
| ROM | 178.39 MB |
| Network Data | 2G/ 3G / HSDPA 7.2 |
| OS | Android 2.3.7 |
| Screen Size | 3.5 inch |
| Resolution | HVGA (480*320) ~165 ppi pixel density |
| Shot Mode | Single/ Smile / Continuous / Panorama |
| Image |  |
| Mode Name | galaxy s9 plus |
| Brand Name | Samsung |
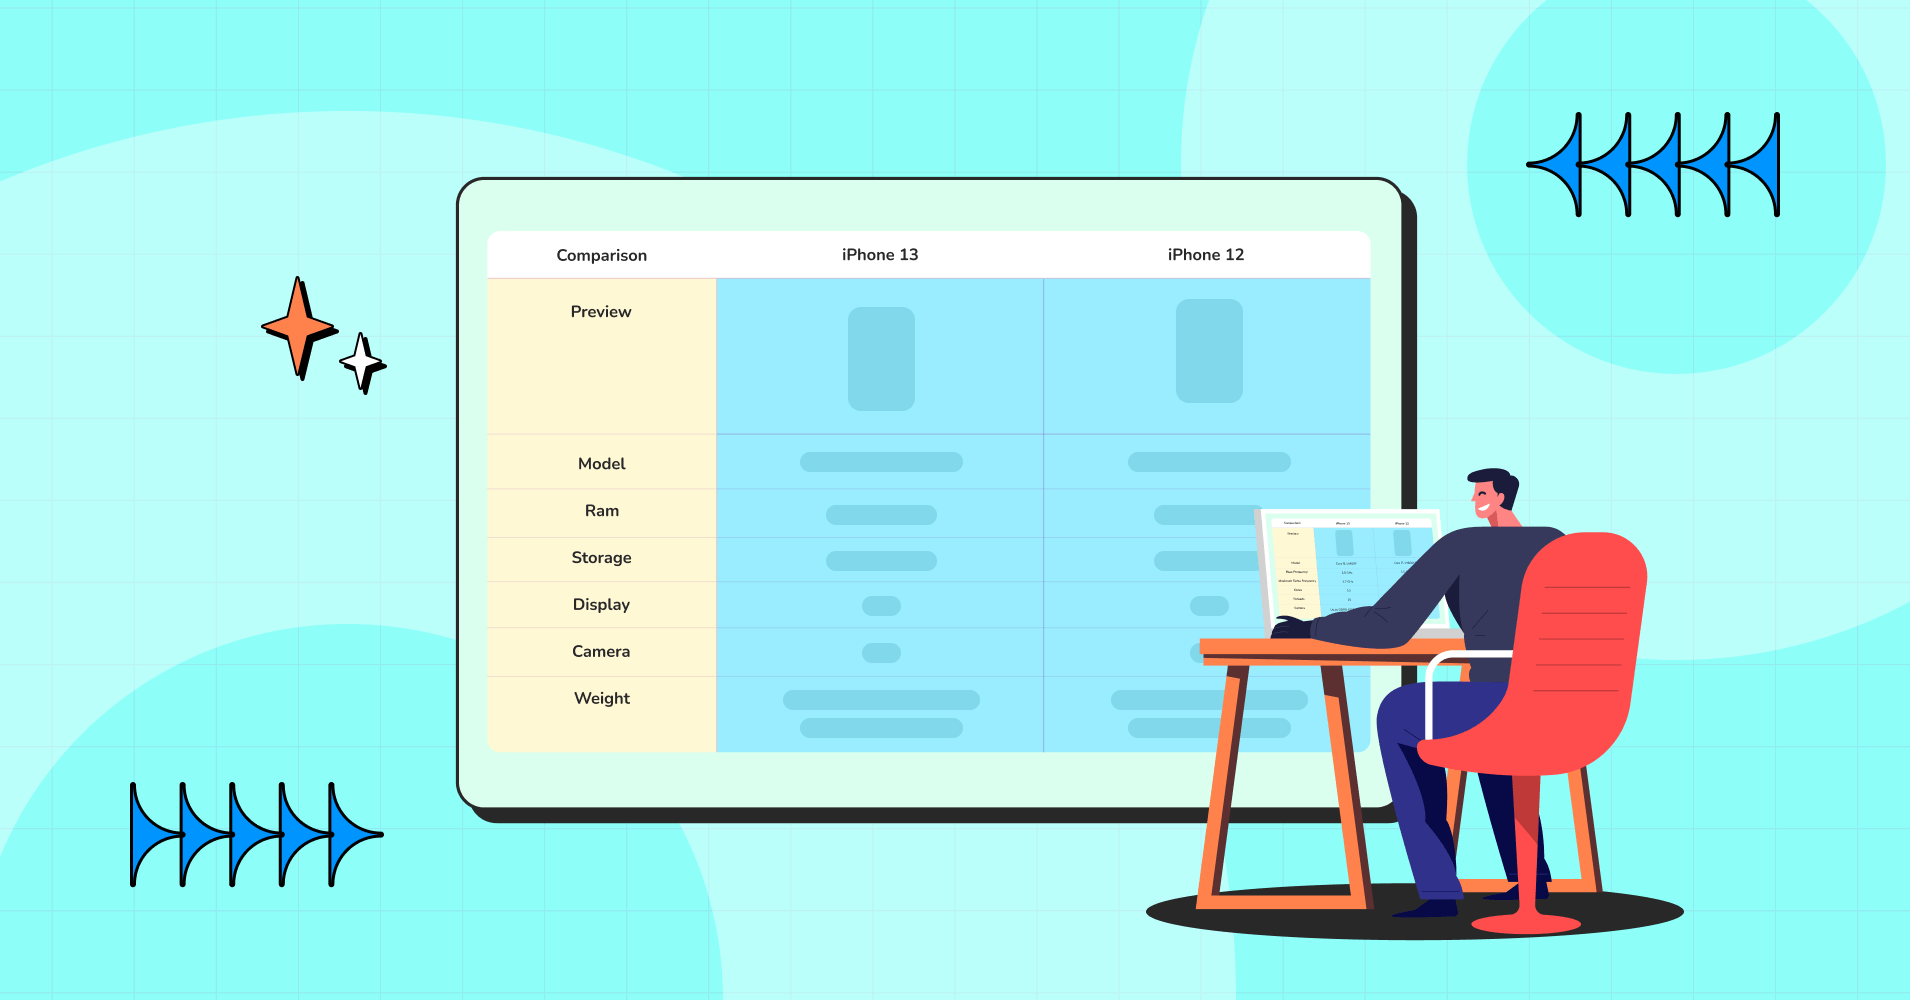
- Comparison Tables: When you want to compare multiple products, services, or options, a comparison table is the way to go. List the features side by side, making it easy for users to see the differences and make informed decisions.
| Features |  | |||
|---|---|---|---|---|
| Table Design Options | Unlimited | Limited | Unlimited | Limited |
| Colors | Unlimited | Limited | Unlimited | Limited |
| WooCommerce | ||||
| FluentCart table | ||||
| Google Sheets sync | ||||
| WP Posts table | ||||
| Drag & Drop | ||||
| Pre-built templates | ||||
| Custom filter | ||||
| Export-Import Table | ||||
| One-click Migrate from TablePress | ||||
| Fluent Forms integration | ||||
| Advanced Styling | ||||
| ACF Field Mapping | ||||
| Charts | ||||
| Conditional formatting | ||||
| Value transformation | ||||
| Custom CSS | ||||
| Trash/restore |
- Pricing Tables: Pricing tables are essential for showcasing different pricing tiers or subscription plans. Include features, prices, and any other relevant details. Users can quickly compare and choose the one that suits them best.
PRO | Top! PLUS | BUSINESS |
4.99$/month with 4 days free trail | 9.99$/month with 4 days free trail | 19.99$/month with 4 days free trail |
1 GB Disk Space | 1 GB Disk Space | 1 GB Disk Space |
500 MB Bandwidth | 2 GB Bandwidth | 5 GB Bandwidth |
1 Sub Domain | 3 Sub Domain | 10 Sub Domain |
1 Email Account | 5 Email Account | 10 Email Account |
SMTP | SMTP | SMTP |
Monthly Traffic: 1000 GB | Monthly Traffic: 2000 GB | Monthly Traffic: 3000 GB |
Network Port: 50 Mbps | Network Port: 75 Mbps | Network Port: 100 Mbps |
- Product Review Tables: A table listing features and ratings helps visitors quickly select the best option and highlights your advantages over competitors without switching tabs.
- Statistical Data Tables: Whether it’s survey results, market analysis, numerical data, or sports tables make it more organized and readable.
- Event Schedules or Timetables: For event websites or official time schedules, tables help present the information properly and easily accessible.
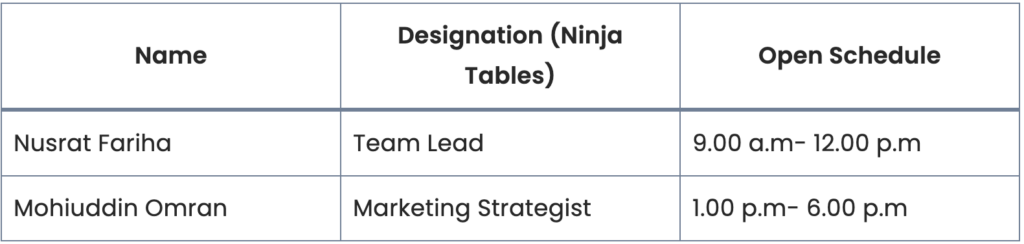
- Team or Staff Directory: A table to showcase team members, their roles, and contact information.
- Course & Class Schedule Table: If you run an educational website, tables can neatly present class details, topics, and schedules.
Now if you’re wondering how to make the most out of these, you’ve come to the right place. We’ll get started with all the basics.
How to create tables in WordPress?
As with most WordPress tasks, you can approach creating tables in several ways. Your selection will depend on the type of table you want to create and what tools you prefer. We’ve summarized all the possible means of creating WordPress tables based on your priority, resources, and intuitive designs.
Create tables using the WordPress block editor
The table block editor especially comes in handy if you need an easy-to-make static basic table without any fancy features; like filtering, sorting, highlighting, or any other dynamic features.
You can fully optimize the WordPress default table builder without leaving your dashboard and any other intermediary plugin. How so?
Let’s give it a shot.
- Log into your WordPress dashboard, then head to posts – add new.
- Once redirected, hit the + symbol, and select the WordPress table block.
- Enter your preferred row and column numbers and proceed to Create table. Don’t worry; the numbers can be changed or customized later.
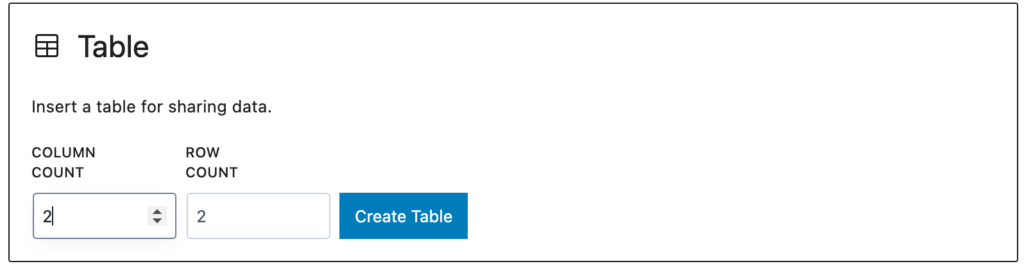
- Once you populate it with numbers and data, the table will automatically resize and take form.
- Congratulations! Your table is ready to use.
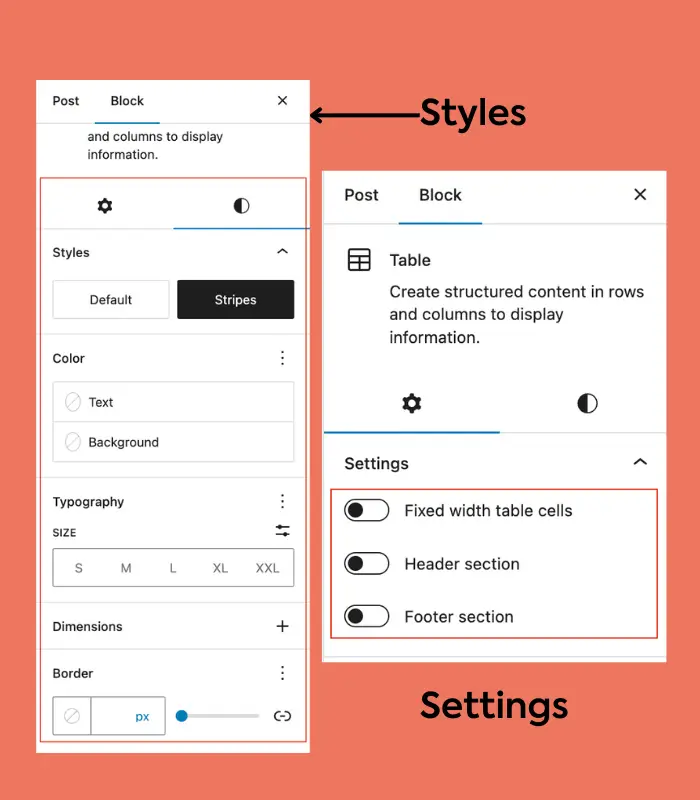
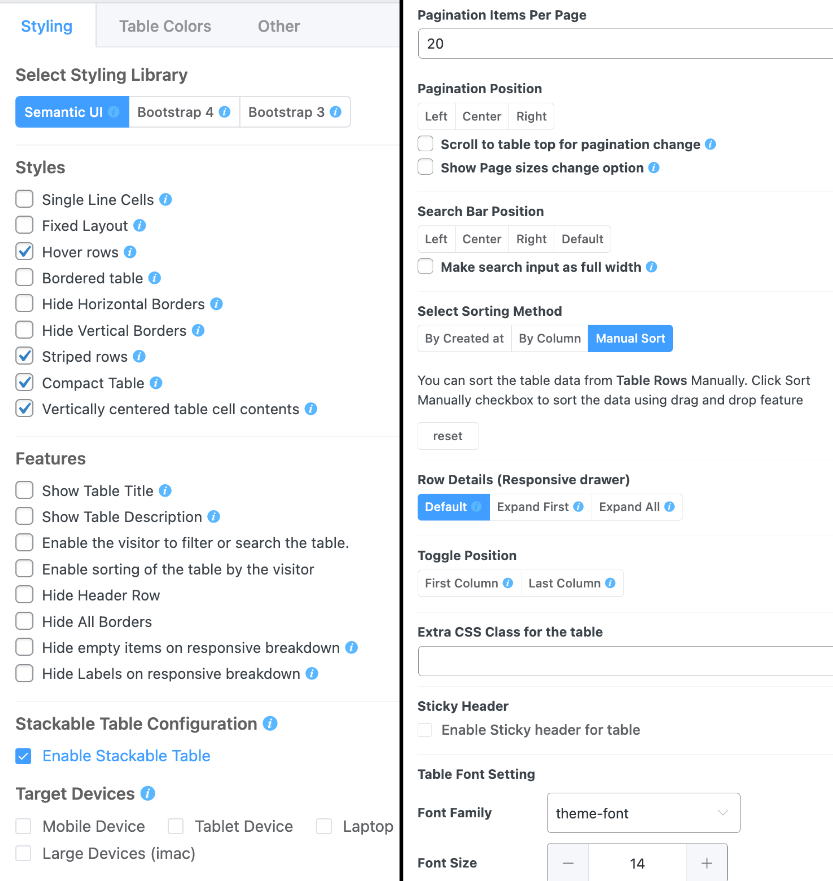
Configure Settings and Styles
Here are a few settings you can start with (editable via the right-hand block panel) –
- You can easily delete or add rows/cells, select the table bar, and align those, as you need.
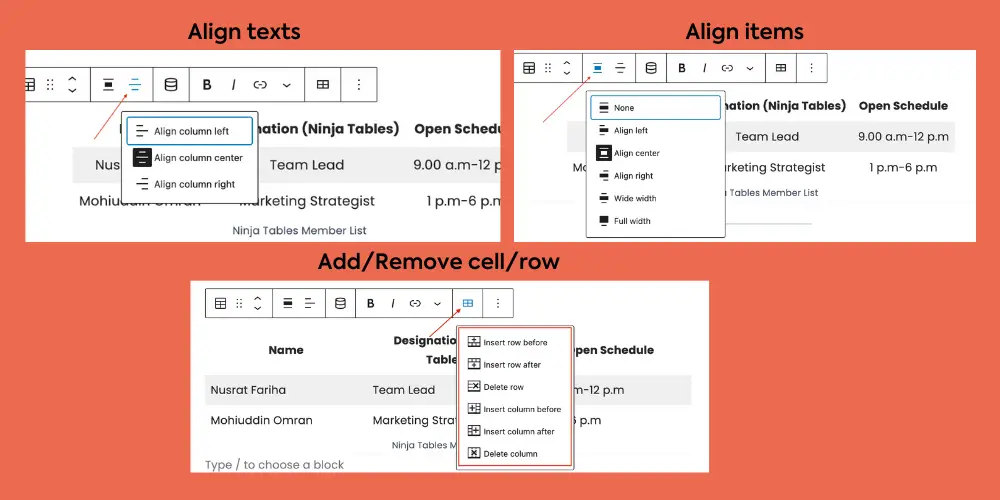
- Toggle in the sidebar to activate those sections if needed.
- The Styles tab lets you switch between a grid and a stripes-based table.
- Customize text and background colors, adjust typography, and set cell dimensions.
- Under ‘Settings’ you can find options like “Fixed width table cells, Header section, and Footer section”.
- Preview your post or page to check how the table will appear. You’re good to go!
Drawback of WordPress table block editor
However, the block lacks advanced features like search filtering, custom sorting, and more. It also doesn’t let you efficiently use the same table across multiple areas across your WordPress website. To create advanced tables, you will need to use a WordPress table plugin.
If you think that’s too basic, and calls for a little personalization, style, and dazzle. Well, we’re up next with Ninja Tables, which offers every dynamic feature you might need.
WordPress table with Ninja Tables: A step-by-step guide
There are several table-building options in Ninja Tables. We’re going to cover the 4 primary options here.
- Drag-and-drop tables
- Advanced mode (Classic table builder)
- Import JSON/CSV
- Pre-made templates
Drag and drop tables
First up is the well-kept ‘drag-and-drop’ feature that lets you effortlessly create tables in WordPress. It’s popular for its ease of use. You can create and edit your tables fast without moving to other tabs or windows. Follow the step-by-step process:
- Go to Dashboard > Ninja Tables.
Manually create a table with drag & drop
- Step 1: Click the “+/-” buttons or type the desired numbers to add rows and columns
- Step 2: Click “Create”
- Step 3: Pick and drag any table element to drop on the table
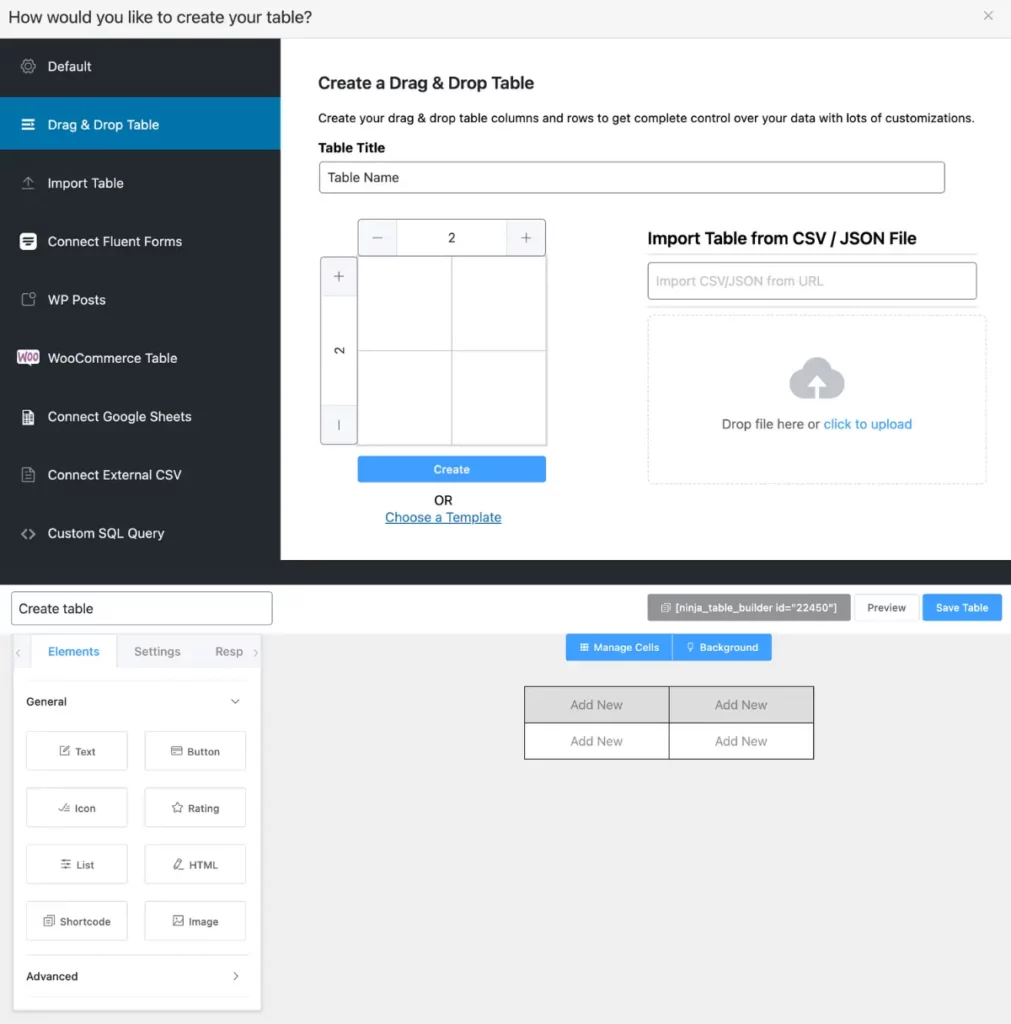
You can drop multiple elements in one cell.
Import CSV/JSON
This feature is amazing because you can edit any table with the drag-and-drop options when you import its CSV/JSON file.
- Drop the imported file to upload
- Paste the URL of the table you want to import (Pro)
Edit prebuilt table templates
After selecting any of the tables from 4 design categories, it’ll open on your tab with numerous customization and edit options. You can easily edit buttons, texts, colors, width, everything, and anything. To get this opportunity, you can try out the Ninja Tables Pro version.
Drag-and-drop styling and configuration:
You’ll find three primary tabs when editing: elements, settings, and responsiveness. The other two buttons- manage cells, and background sits on top of the table for more customization.
Advanced mode (Classic table builder)
Now what about the advanced mode or manual table creation under this plugin? This table functionality ultimately lets you create any table from scratch. With this, you can easily add rows and columns, add data to those, and fluently display those tables.
- Navigate to the Ninja Tables Plugin from the sidebar.
- In the popup menu, choose “Default” or manual table creation.
- Under “Manually Create a Table,” enter a table name and description.
- Hit the Add button to create a new table, and the ‘Table Rows’ tab will open.
- Click on the Add Column button to create columns.
- In the popup, enter the Column Name and Column Key.
- Select your data type (e.g., text, numeric) from the options.
- Then click the blue Add Column button to confirm.
- Use the ‘Add data’ to input data.
Table Configuration Tab:
- In this tab, you can set the Column Name, Column Key, Data type, Responsive breakpoint, and more.
- Click the edit icon for each column to access four options: Basic Settings, Advanced Settings, Conditional Formatting, and Transform Values.
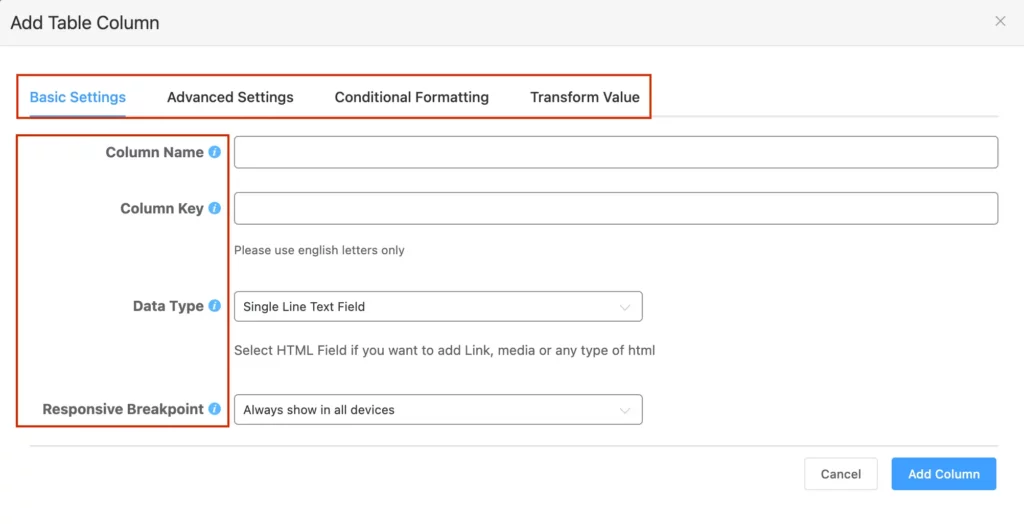
Table Design Tab:
Customize your tables to be scrollable, highlighted, and include media or links. Edit colors, add sorting, pagination, CSS styling, and background images as needed.
Import-export table using Ninja Tables
Simply just import the CSV/JSON file to then later personalize, customize, and tweak as you want.
- First, navigate to the Ninja Tables dashboard and click on the Import Table button on the top right of the screen.
- Now, go to the Import button (on the left), and you will get an Import Format field, where you can choose your desired table format.
There are some options available for you so you can easily opt for one you find easier.
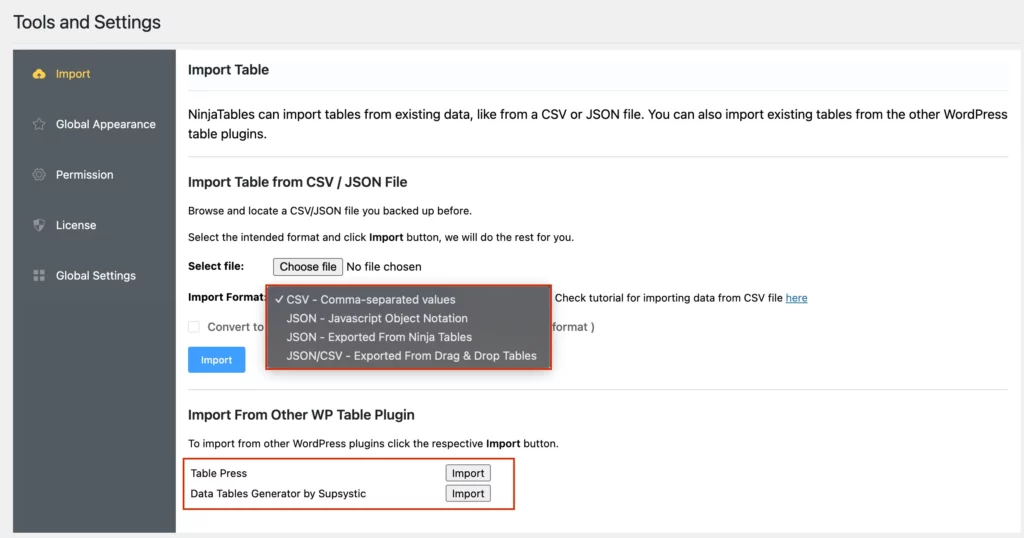
For more detailed instructions you can follow this guideline on how to export-import tables in WordPress using Ninja Tables. Also, you can easily connect your Google Sheets table, or Fluent forms data to Ninja Tables. These integration options further make the work much easier for you.
Now, how to add a table in WordPress posts? Just add data, save it, and copy the shortcode to later embed them in your site.
Free table templates
Do you know what makes Ninja Tables so loved by our users? We offer many table design templates that are ready to customize and tweak to fit your needs. This feature is fun and easy to use, saving you time and effort.
Here’s how to get started:
- Go to our template page, pick a table template, and click “View.”
- Download the zip file.
- The zip file contains a text file with instructions, a clear image of the table, and the table JSON file.
- Import the JSON file to your Ninja Tables dashboard.
- Select the import format according to the table mode (Advanced or Drag and Drop).
- Hit import, and you’ll have the same table shown on the template page.
- Your Table is now ready, and all you’ve to do is fill it with pieces of information, customize it, and add new entries as you need.
This process helps automate your workflow, allowing you to focus on quick, easy edits to match your site’s aesthetic. Ninja Tables features a user-friendly interface that makes it stand out from other table plugins, offering both ease of use and advanced customization.
Why you should use table builder plugins?
The WordPress editor is intuitive but lacks advanced table functionality. For dynamic and responsive tables, consider using a plugin. Basic table designs are limited and static, while advanced WordPress table plugins offer more features and better compatibility.
Mastering UX/UI design with WordPress tables can enhance your site’s user experience. There are many table builder plugins available; we recommend Ninja Tables for its customization options and advanced features.
Let’s see what Ninja Tables bring to the table when it comes to the pouring numbers and data feast.
Conclusion
To recap, creating an appealing table layout with strategically placed buttons, high-quality multimedia content, intuitive navigation, scrolling, pagination, and cross-device responsiveness ensures a great user experience. Yes, all this daunting tasks can be easy and fun to do!
You want to break through the clutter with effective data visuals? You can quickly construct tables in WordPress using plugins, which allow for endless modification to create unique and flexible tables. Also, you can meet your needs by using either the regular WordPress block editor or a responsive WordPress table plugin. Whichever suits your priority!
We hope the article has helped you better understand how to construct tables in WordPress. Feel free to share your preferences and reach out if you have any questions.
Ninja Tables– Easiest Table Plugin in WordPress