How to Integrate FluentCart with Ninja Tables

Any product table you want, can be created with your favourite table plugin – Ninja Tables. And here we are again, with another table creation option for you. This time, it’s FluentCart tables!
FluentCart is the new sensation in the WordPress world, especially in the eCommerce market. This plugin redefines eCommerce by ensuring a “faster, lighter, and simpler” solution.
And Ninja Tables just had to get in the game by integrating FluentCart!
If you’re using FluentCart for your business, Ninja Tables seamlessly integrates with it and you can display your products in customized tables.
Let’s unroll the details.
Integrating FluentCart with Ninja Tables
This FluentCart and Ninja Tables integration is simple. You only need the 2 plugins activated in your WordPress dashboard and you’re good to go!
FYI: Before you add FluentCart to your dashboard, you won’t see the “FluentCart Table” option appear on the table creation menu.

The above menu appears with all these options only after FluentCart is installed and activated. And, of course, if your Ninja Tables is updated.
If you tried the Ninja Tables Fluent Forms integration, you know how it works.
This integration is an easy 3-step process for you even if you’re a beginner. You only need products to connect and create!
Step 1: Add FluentCart products
To start selling your products in FluentCart tables, you need to add products.
Add all the products you want to sell, categorize them, choose their prices, set other details.

For your convenience and to help you try by yourself first, FluentCart has a few dummy products ready. Click the button and products will be published. Or you can add your own products.
And the next step, you can select them and get started with Ninja Tables.
Step 2: Pick “FluentCart Table” from the menu
Now starts the fun part!
Go to Ninja Tables and hit “+ Create New Table.”
You’ll see the table creation options in a new window. Select “FluentCart Table” here.
Step 3: Select FluentCart products to show on the table
As soon as you select “FluentCart Table,” you’ll see the products you added earlier (your own or dummy).

We added dummy products “Men’s Shoes.”
Here’s your checklist in this step:
- Name your table in the “Table title” box
- Select the products by category
- Select products by brands (if needed)
- Hide out-of-stock items
- Decide the product order (by title or type)
Hit the “Create Products Table” button once you’re done.

Don’t worry, you can always change what you selected. That’s in the next step.
Step 4: Customize and embed
Congratulations! You’ve created your first FluentCart table!
You can see the familiar Ninja Tables tabs at the top of your table backend now.
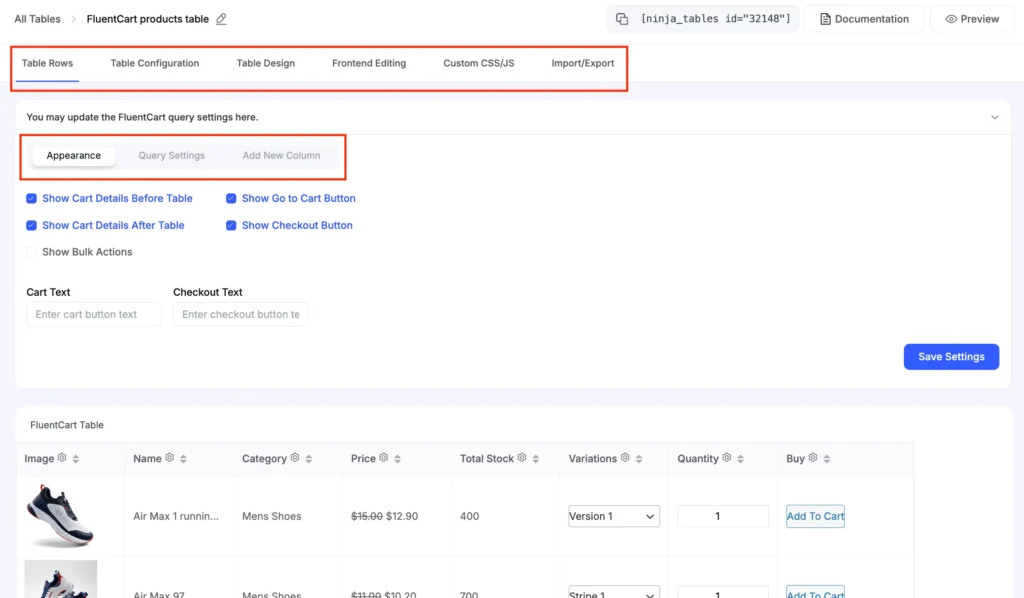
For FluentCart integration, you get 3 more:
- Appearance
- Query Settings
- Add New Column
Checkout FluentCart integration doc if you need.
Appearance
Under this section you can see some cart button details and bulk options.
Choose cart button position (before or after table), allow checkout button to be visible and bulk options.
If you prefer to change cart button and checkout button text, you can do that here as well.
Query Settings
The next tab is for “Query Settings” and this is where you select more products or deselect existing ones. If in the table creation process you change your mind, this tab will undo/redo it for you.

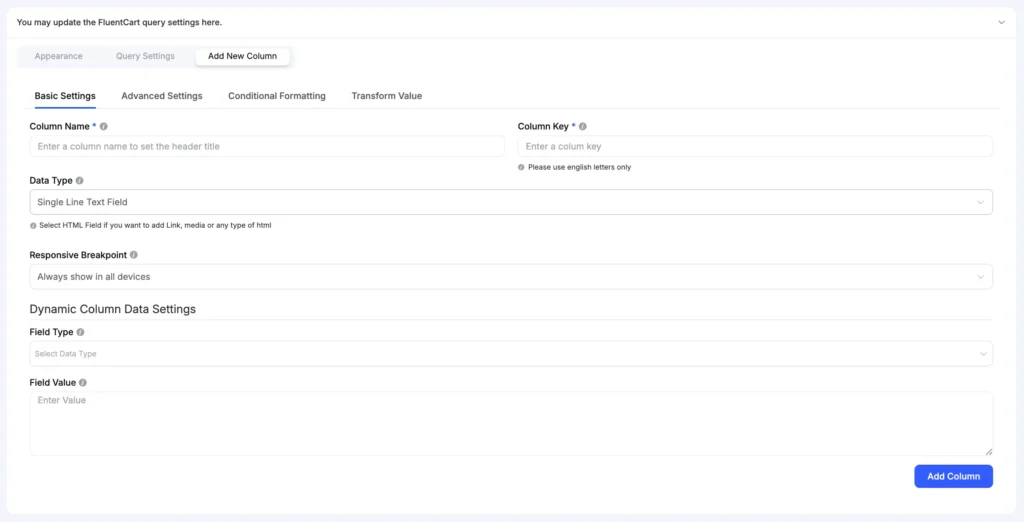
Add New Column
Need to add another column for custom info? Move to “Add New Column” and create.
This follows the regular Ninja Tables protocol. You can customize column title, data type, dynamic data settings, breakpoints, column width, conditions, value transformation, and more.
Save all your settings and the table’s done.
Copy the shortcode given above and embed anywhere on your website.
FluentCart Table Frontend with Ninja Tables Features
It’s a simple integration and a way to display your FluentCart products in customized product tables. So obviously, you get to use all the Ninja Tables features. For example,
- Custom filter
- Search/sort/filter
- Conditions
- Pagination
- Custom buttons
- Bulk actions
- Table color and design
- Custom CSS, and more.
Here’s a FluentCart table created with Ninja Tables.
| Image | Name | Category | Price | Total Stock | Variations | Quantity | Buy |
|---|---|---|---|---|---|---|---|
 | Air Max 1 running shoe | Mens Shoes | 100 | | |||
 | Air Max 97 | Mens Shoes | 100 | | |||
 | Air Max Essential | Mens Shoes | 100 | | |||
 | Elegant Running Shoe | Mens Shoes | 100 | | |||
 | Grey and Red sneakers | Mens Shoes | 100 | | |||
 | Purple Air Max trainers | Mens Shoes | 100 | | |||
 | Red Black Stripped Sneakers | Mens Shoes | 100 | | |||
 | Sleek black and white Sneakers | Mens Shoes | 100 | | |||
 | Stylish white and black sneakers | Mens Shoes | 100 | | |||
 | Stylish white and blue sneakers | Mens Shoes | 100 | |
As you can see, this table uses filters and colors to make it more interactive in the frontend for your customers.
See what FluentCart says about this integration.
Product tables like this encourage people to buy from you. So if you’re done setting up your store with FluentCart, Ninja Tables is what you need next!
Get Started with Modern eCommerce!
“Fluentcart is an amazing Ecommerce solution”
“Ninja Tables is a superb plugin”
Kind words from the customers themselves!
Ninja Tables is a smart table builder plugin and FluentCart is a smart eCommerce solution.
Connecting FluentCart with Ninja Tables means you get to organize your products in customized and interactive product tables and boost your sales.
So, when are you trying it out?
Ninja Tables– Easiest Table Plugin in WordPress


Add your first comment to this post