How to Merge Cells in a WordPress Table Without Losing Data

Crowded tables push readers away. When multiple cells carry data that belongs together, splitting them across separate boxes creates visual noise that makes tables harder to scan. Or repeating the same values across multiple cells without any parent row or coordination can cause a headache to keep track of. Merging cells fixes this. Ninja Tables gives you two distinct ways to do it, with or without writing a line of code. Here is how both work.
TL;DR:
- Ninja Tables offers two separate table builders, and cell merging works differently in each one
- The Drag and Drop builder lets you merge and split cells visually with no code required
- The Advanced Table (Classic) builder uses the #colspan# value to merge cells horizontally across a row
- Vertical row merging in Advanced Mode uses a custom JavaScript snippet pasted into the table settings
- You can also merge column headers using the same #colspan# method in Advanced Mode
What Does Merging Cells in a WordPress Table Mean?
Merging cells means combining two or more adjacent cells into one single, larger cell. The borders between the selected cells disappear, and their space becomes unified. This is useful when a header needs to span multiple columns, when grouped data shares a label, or when repeated values in a column are better presented as one continuous block. In standard HTML, this requires writing colspan or rowspan attributes directly in the table markup. In WordPress, that means editing raw HTML or relying on a table plugin that handles the logic for you. Ninja Tables supports both approaches, depending on which builder you are working in.
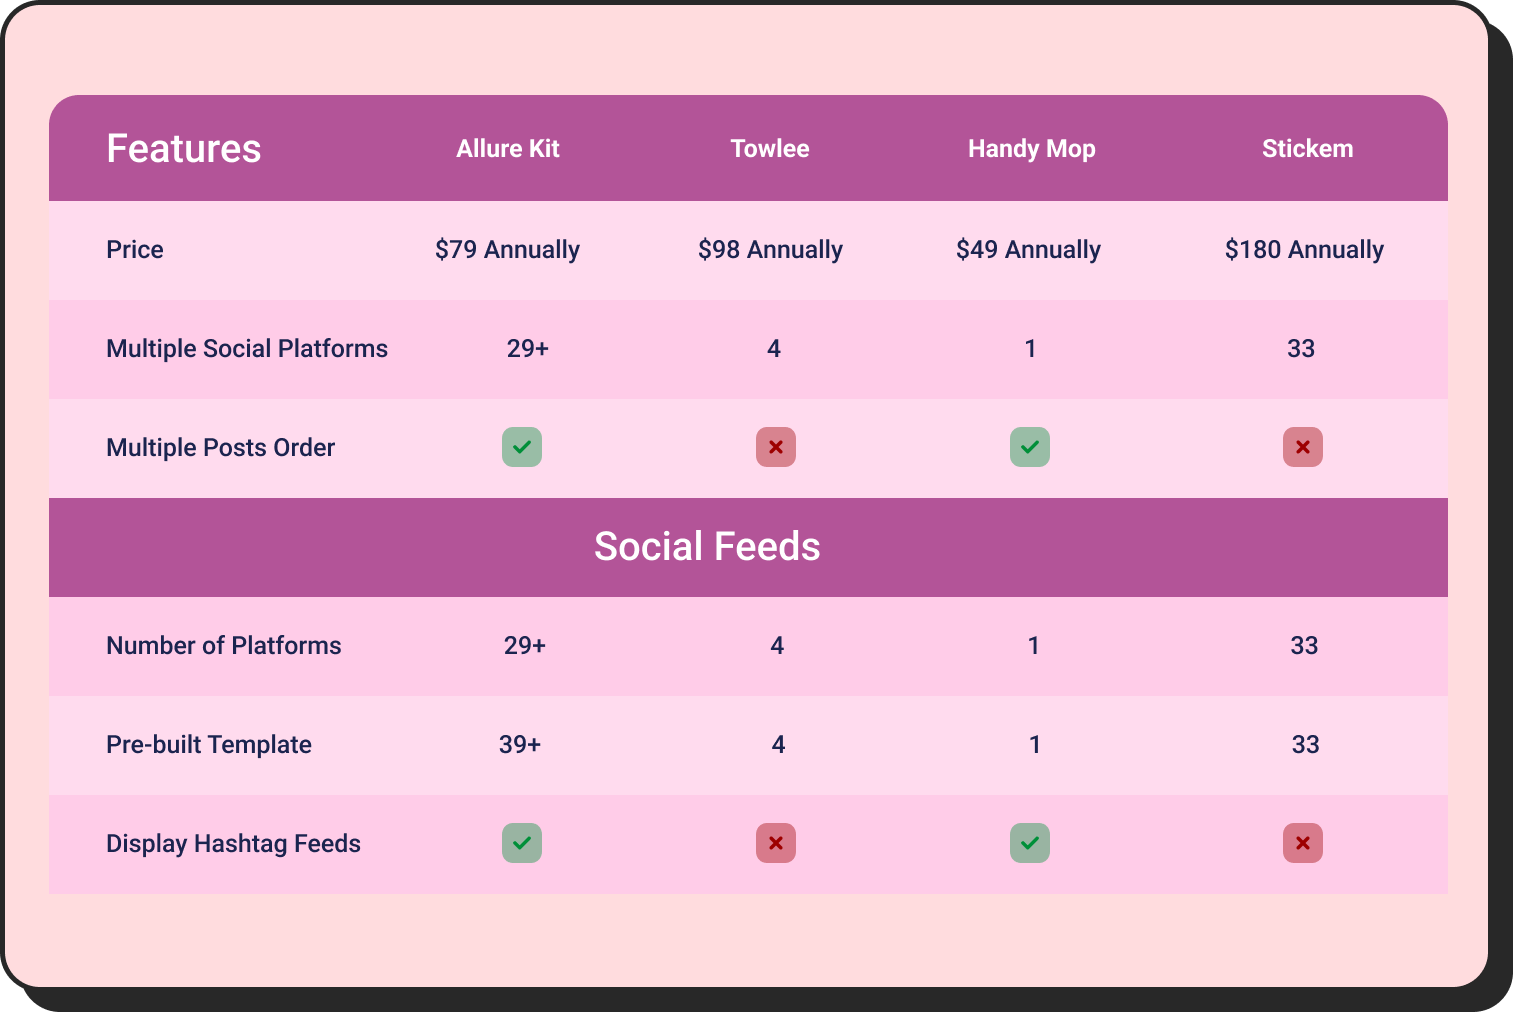
Here’s one with merged headers and row values:
| Features | Ninja Tables | wpDataTables | TablePress | WP Table Builder | ||||
|---|---|---|---|---|---|---|---|---|
| WooCommerce |  |  | | | ||||
| Google Sheet data sync | | | | | ||||
| Fluent Forms | | | | | ||||
| WP Posts | | | | | ||||
| Charts | | | | | ||||
| Simple Table Creation Options | ||||||||
| Drag & drop | | | | | ||||
| Pre-built templates | | | | | ||||
| Conditional formatting | | | | | ||||
| Table design | | | | | ||||
Two Table Modes with Different Methods
Ninja Tables currently ships with two distinct ways to build tables:
- Simple Mode (Drag and Drop Table Builder): A visual builder where you construct tables by placing elements into cells. Cell merging here is done by selecting cells on a canvas and using a merge control. No code required.
- Advanced Mode (Classic Table Builder): A data-driven builder where you define columns, import rows, and configure behavior through settings panels. Cell merging here uses a special cell value and, for row merging, a custom JavaScript snippet.
The method to group rows and columns you use depends on which mode your table was built in. You cannot switch between modes for an existing table, so identify your table type first before following either set of steps below.
Method 1: Merging Cells in the Drag and Drop Builder
The Drag and Drop builder introduced a visual cell management system that makes merging the most straightforward it has ever been in Ninja Tables. You select the cells you want to combine, and the plugin merges them. No attribute typing, no code, no GitHub files.
Open your table in the Drag and Drop builder. In the table canvas, look for the Manage Cells option in the table configuration panel on the left side. This opens a dedicated cell management view where you can see all your rows and columns laid out as a grid.
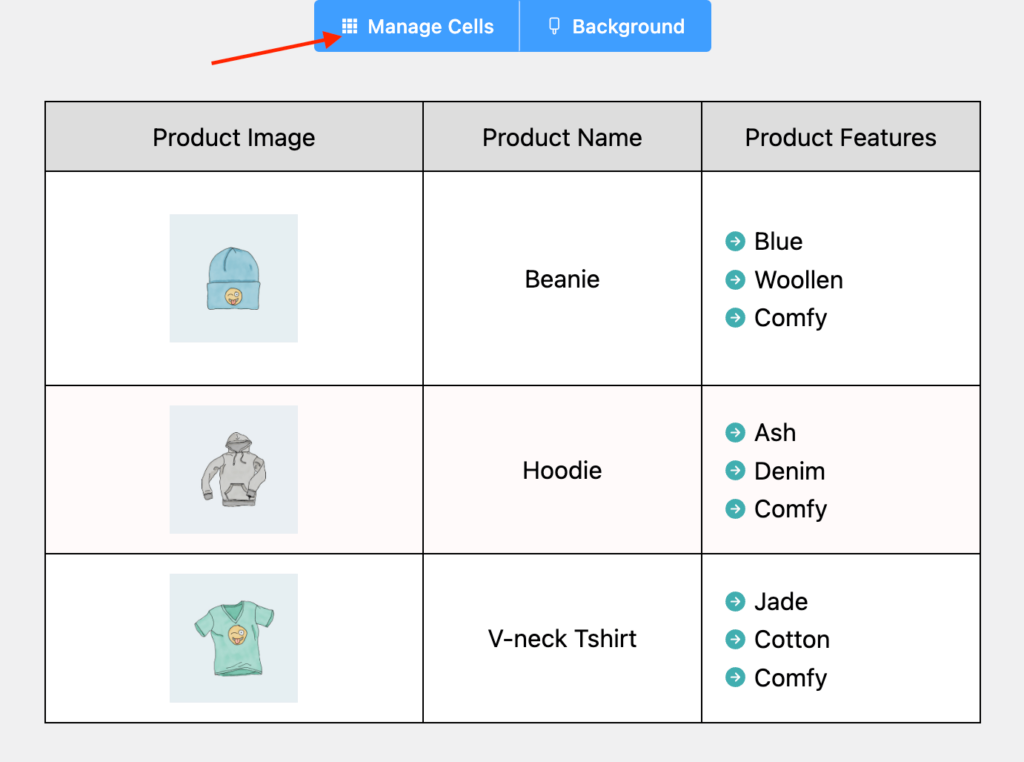
How to merge cells
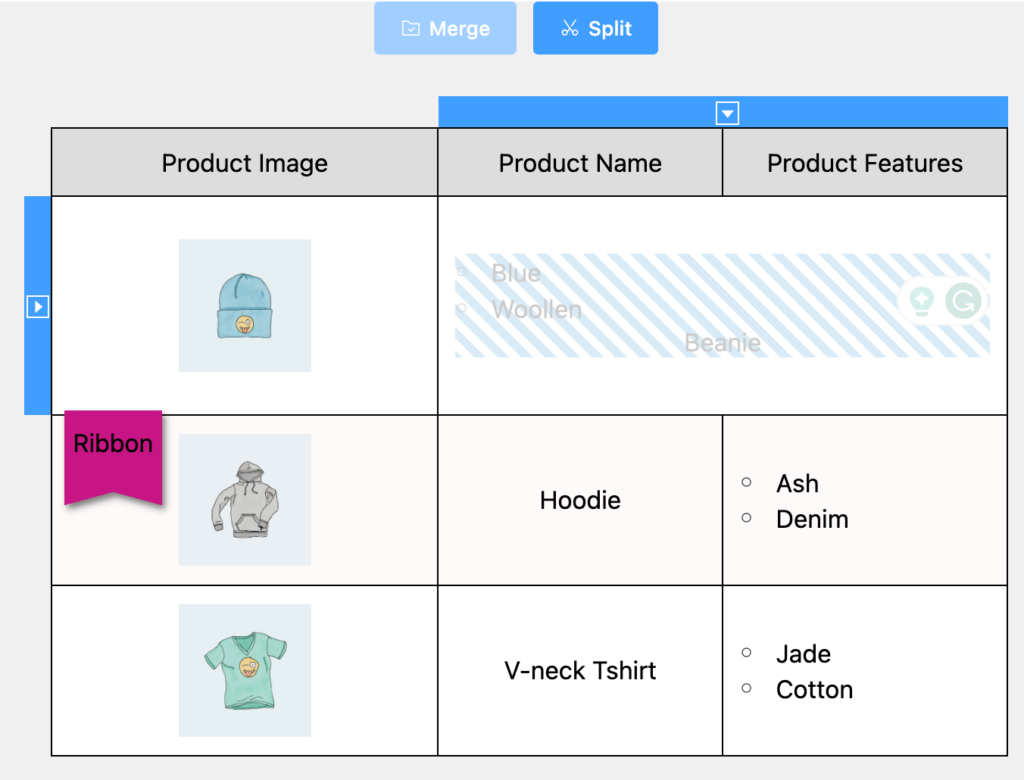
Step 1: In the Manage Cells view, click on the first cell you want to include in the merge.
Step 2: Hold and drag to select the adjacent cells you want to combine. Selected cells will be striped for better visibility.

Step 3: Right-click or use the merge control that appears above the selection. Choose Merge Cells.
Step 4: The selected cells collapse into one larger cell. You can now add content to the merged cell using any available table element — text, image, button, icon, and more.
 718 Cayman S – Porsche $82,500
| Features
| |
Description A well-maintained 2019 Porsche 718 Cayman S finished in Guards Red over black leather. Powered by a 350 hp turbocharged engine paired with a 7-speed PDK transmission, it offers sharp handling and everyday usability. Low mileage and excellent condition make it a strong choice for drivers who want performance without compromise. | ||
Find more free table templates like this on the Ninja Tables Templates page.
Get table templates for free
WooCommerce

Amazon Products
WP Posts
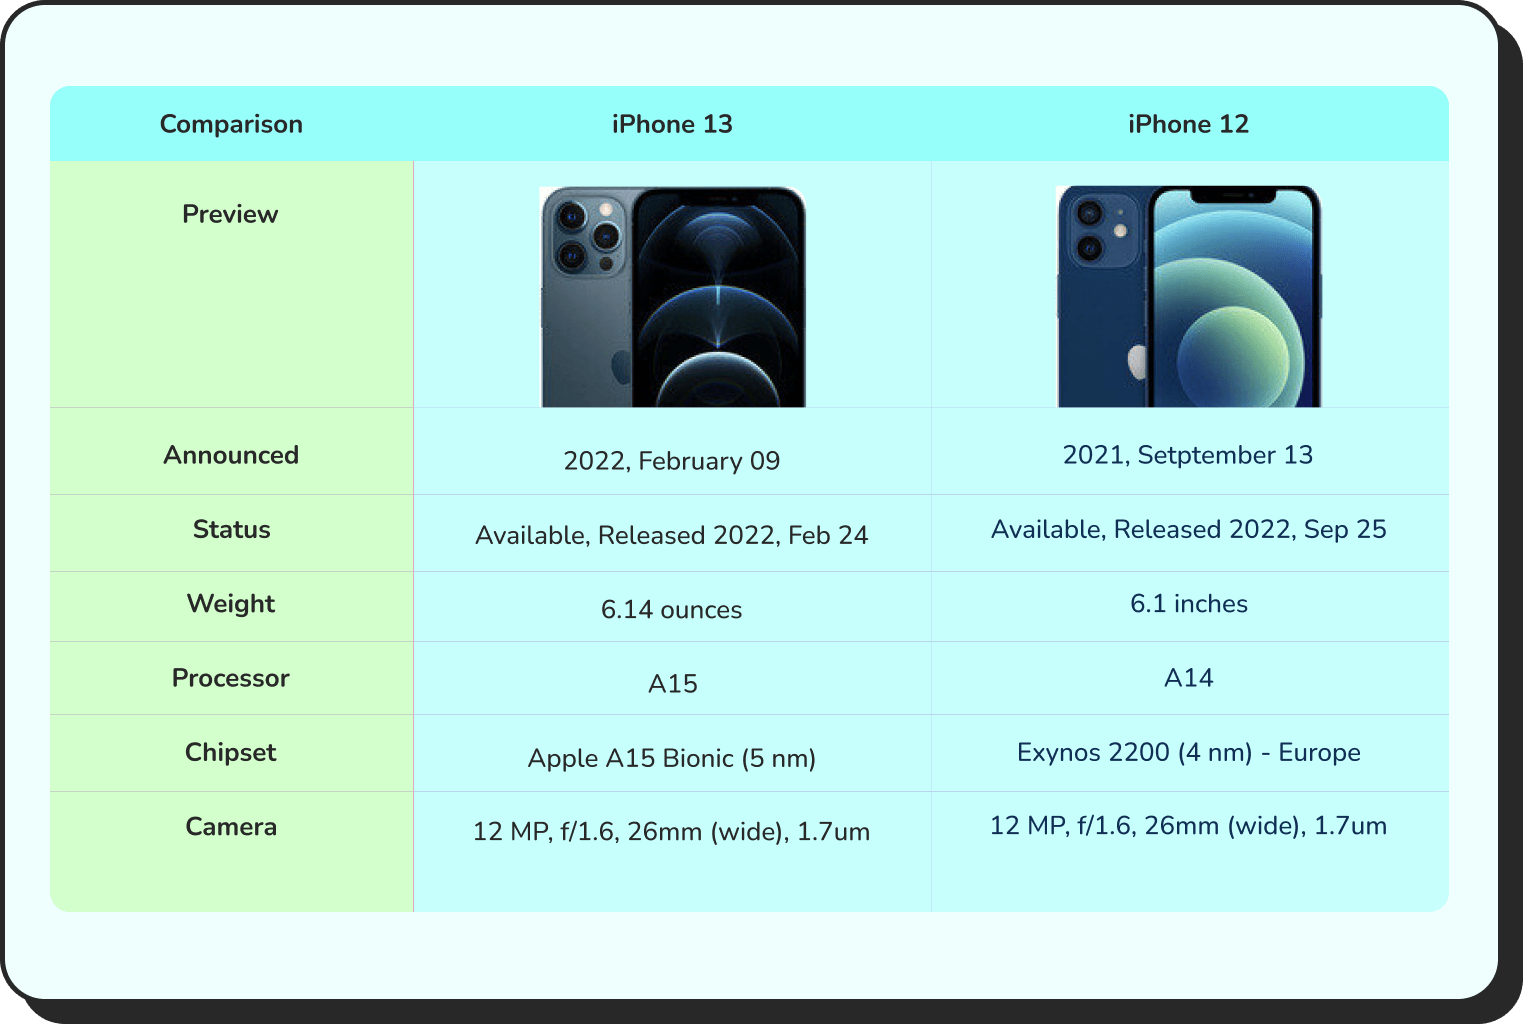
Products Comparison

Pricing Table
Features Comparison
How to split table cells
To reverse a merge, click on the merged cell in the Manage Cells view and choose Split Cell from the control panel. The cell returns to its individual state. Any content that was in the merged cell remains in the first cell of the split group.
Method 2: Merging Cells Horizontally in Advanced Mode (Colspan)
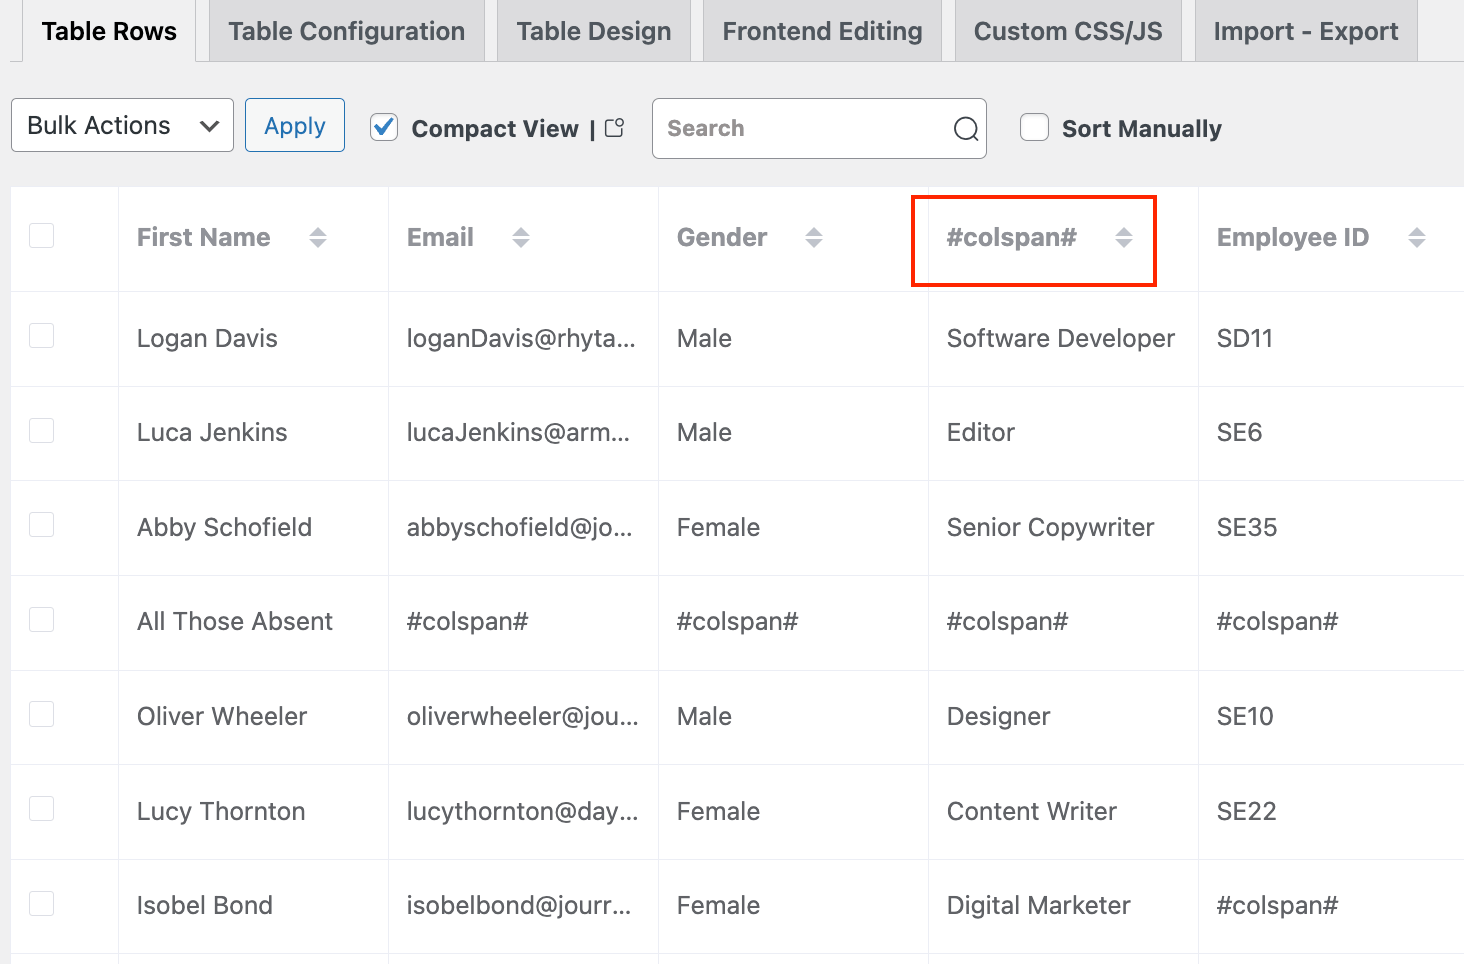
In the Advanced Table builder, horizontal cell merging works through a reserved cell value. When Ninja Tables reads #colspan# in a cell, it merges that cell with the one directly to its left in the same row. This method requires the table to be set to Advanced Table (Legacy) rendering.
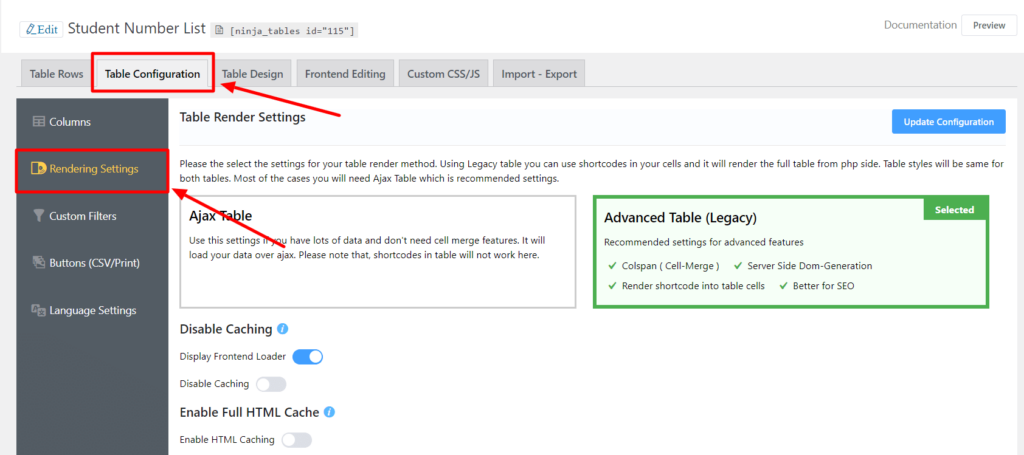
Note: Colspan/cell merge only works when your table’s render type is set to Advanced Table (Legacy). Go to Table Configuration > Rendering Settings and confirm this is selected before proceeding. If your table is on a different render type, the #colspan# value will display as plain text rather than triggering a merge.
Step 1: From your Ninja Tables dashboard, click Edit on the table you want to modify. This opens the table in the Advanced Mode editor.
Step 2- Set the render type: Go to Table Configuration > Rendering Settings. Set the render type to Advanced Table (Legacy). Save the setting before moving to the next step.
Step 3- Edit the target cell: In the Table Rows panel, locate the row containing the cells you want to merge. Click the pencil icon on the right side of the row to open the Update Row lightbox. You can also click directly on a cell to edit it in-line.
Find the cell you want to absorb into the preceding cell. Clear its existing content and type #colspan# as the new value.
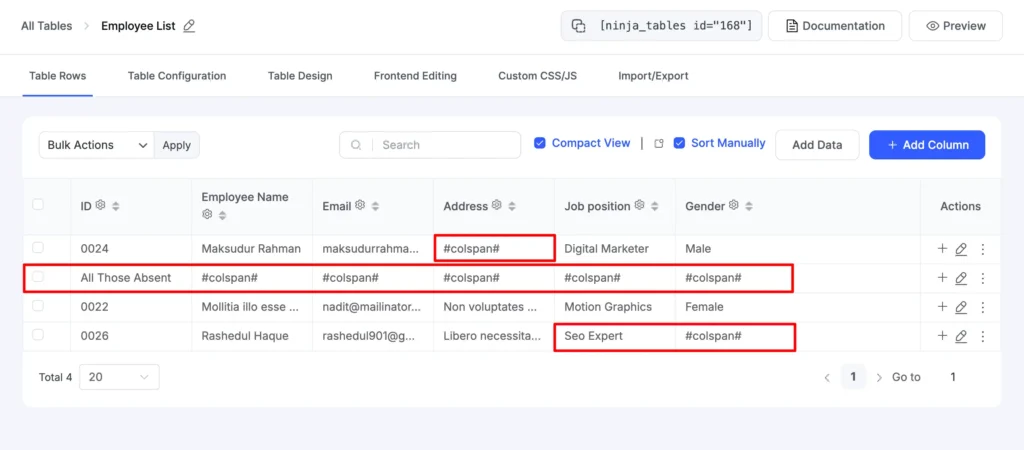
Important: Adding #colspan# will erase whatever data was in that cell. Copy any data you need to keep before making this change.
Step 4- Preview the result: Click Preview to open the table in the preview panel. The cell you marked with #colspan# will merge with the adjacent cell to its left, creating one wider cell in that row.
Repeat this in any other rows that need the same columns merged. Each row is configured independently, so you apply #colspan# row by row.
| Product Category | Units Sold | Revenue ($) | Orders | |||
|---|---|---|---|---|---|---|
| January | ||||||
| Wireless Earbuds | 420 | 12,600 | 310 | |||
| Smart Watches | 290 | 21,750 | 210 | |||
| Phone Cases | 860 | 8,600 | 640 | |||
| Bluetooth Speakers | 180 | 9,000 | 145 | |||
| Gaming Mouse | 310 | 7,750 | 260 | |||
| February | ||||||
| Mechanical Keyboards | 140 | 14,000 | 120 | |||
| Laptop Stands | 205 | 6,150 | 175 | |||
| USB-C Hubs | 330 | 9,900 | 280 | |||
Merging column headers
You can also apply #colspan# to column headers. Open the column settings for the header you want to merge and replace the header title with #colspan#. The header will merge with the one to its left. This is useful for creating grouped header rows that label multiple columns under one parent label.
Method 3: Merging Cells Vertically in Advanced Mode (Rowspan)
Vertical merging, or rowspan, combines adjacent cells in the same column across multiple rows. This is a separate feature from colspan and works through a custom JavaScript snippet added to the table’s Custom JavaScript field.
This approach applies automatically to cells that contain identical data in the same column. When the script runs, it scans the column and merges adjacent cells that share the same value into one tall cell spanning the relevant rows.
Step 1: Choose a table with identical row values you want to merge.
Step 2: In your table’s Advanced Mode editor, go to the Advanced Settings panel. Locate the Custom JavaScript field. Paste the copied script into this field and save.
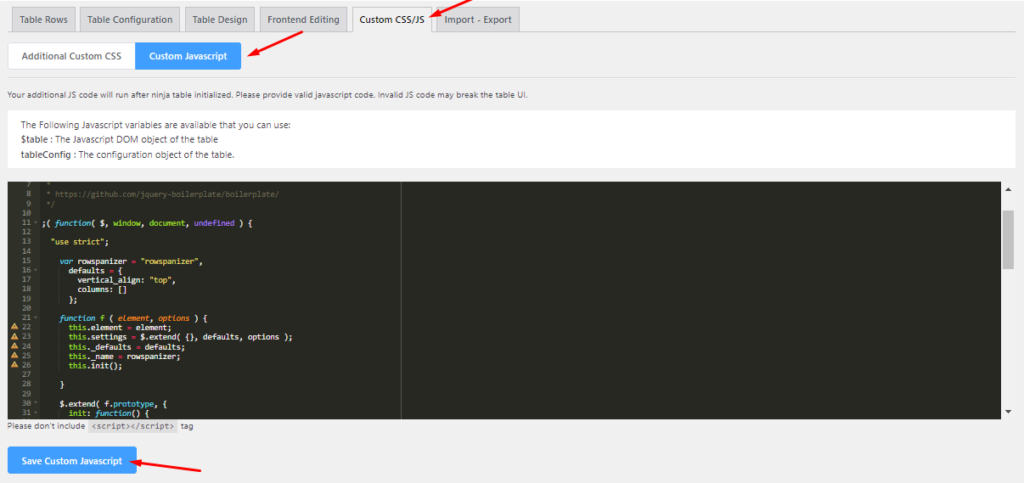
Important: The rowspan JavaScript code is maintained in the Ninja Tables documentation. Open the Rowspan documentation page and copy the code provided there. Do not modify the script.
Step 3: Preview the output- Open the table preview. Columns with repeated adjacent values will automatically merge those cells vertically. Cells with unique values in each row remain separate.
For example, a “course” column that lists “Computer Science” across five consecutive rows will display as one tall cell spanning all four rows rather than the same word repeated four times.
| Department | Instructor | Course | Schedule | Room | Credits |
|---|---|---|---|---|---|
| Computer Science | Dr. Rahman | Intro to Programming | Mon & Wed | Lab 201 | 3 |
| Computer Science | Dr. Rahman | Data Structures | Tue & Thu | Lab 203 | 3 |
| Computer Science | Dr. Rahman | Algorithms | Fri | Lab 205 | 4 |
| Computer Science | Prof. Sultana | Database Systems | Mon | Room 302 | 3 |
| Computer Science | Prof. Sultana | Web Development | Wed | Room 304 | 3 |
| Business Administration | Dr. Karim | Marketing Principles | Tue | Room 101 | 3 |
| Business Administration | Dr. Karim | Consumer Behavior | Thu | Room 101 | 3 |
| Business Administration | Prof. Hasan | Financial Accounting | Mon | Room 110 | 4 |
| Business Administration | Prof. Hasan | Business Analytics | Wed | Lab 120 | 3 |
| Design & Media | Ms. Anika | Graphic Design Basics | Tue | Studio 5 | 3 |
| Design & Media | Ms. Anika | UI/UX Fundamentals | Thu | Studio 5 | 3 |
Note: The rowspan feature in Advanced Mode is applied automatically based on data similarity. It cannot be applied selectively to specific rows unless the script is customized. For selective or manual vertical merging, use the Drag and Drop builder, which gives you direct control over which cells to combine regardless of content.
Which Method Should You Use?
The right choice depends on your table builder and how much control you need:
- For visual, flexible merging: Use the Drag and Drop builder’s Manage Cells panel. You choose exactly which cells to merge regardless of their content, and you can split them again at any time.
- For merging specific cells in a data table: Use #colspan# in Advanced Mode. This works well when you have a structured dataset and need to combine specific cells in specific rows.
- For auto-merging repeated values in a column: Use the rowspan JavaScript in Advanced Mode. This is the fastest option when a column contains repeated category or group labels across many rows.
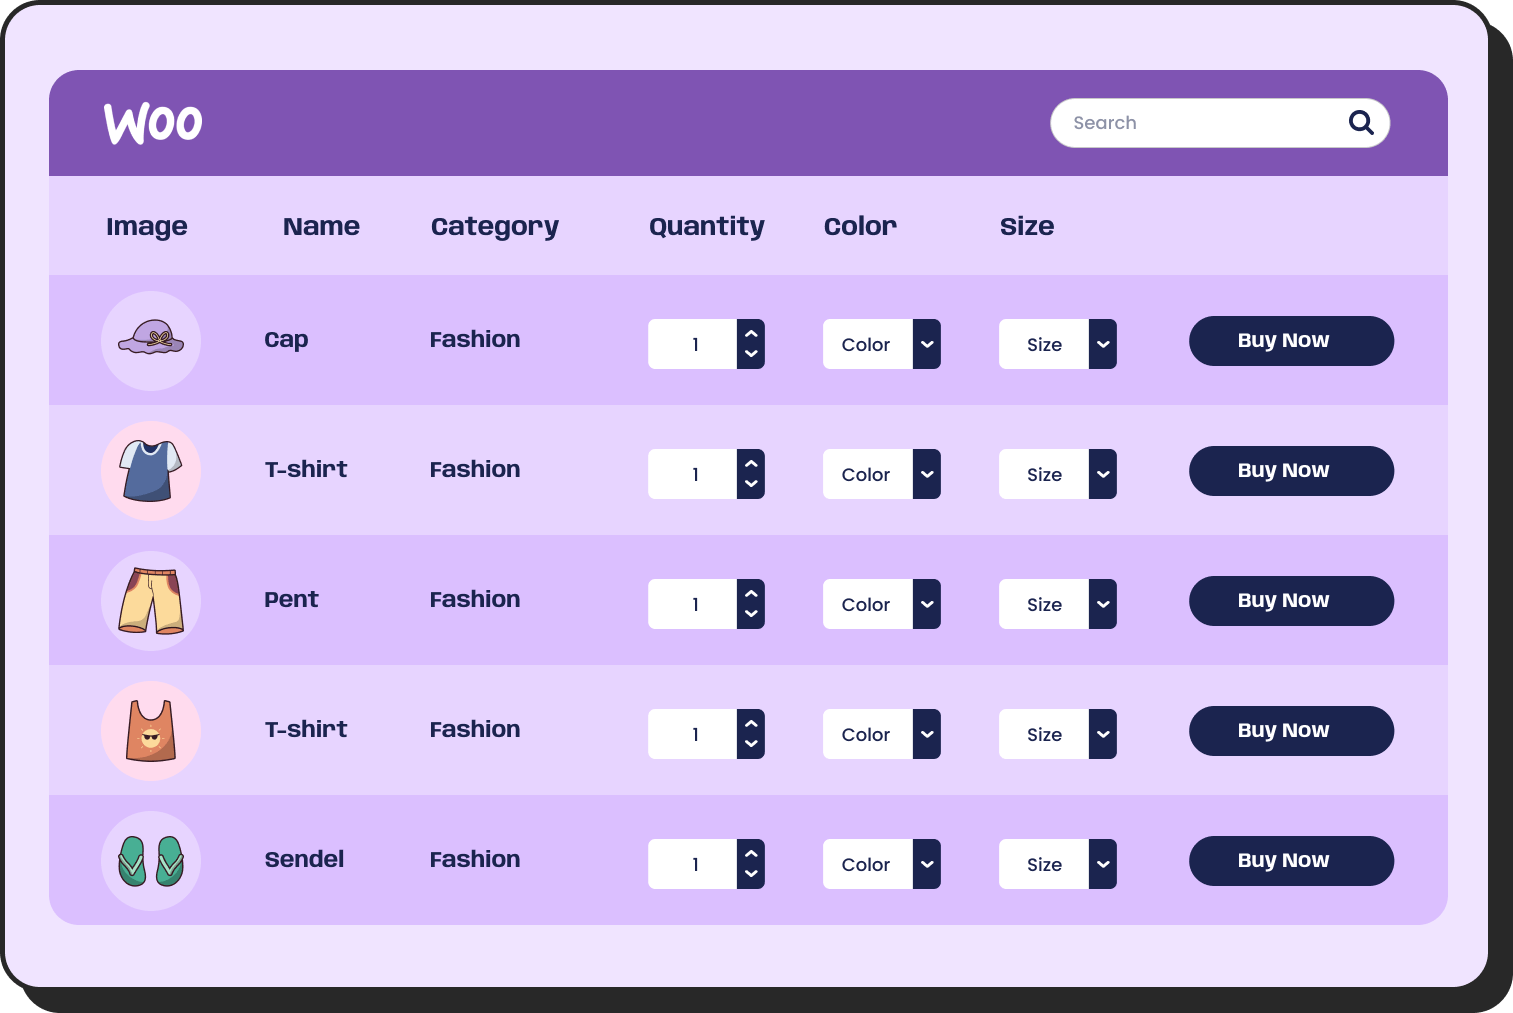
If you are building tables elsewhere on your site, it is also worth exploring what else Ninja Tables handles. Conditional formatting, searchable and filterable layouts, and WooCommerce product tables are all part of the same plugin. You do not need separate tools for separate table types. Neat, right!?
Common Issues and How to Fix Them
- The #colspan# value shows as text in the table
This means the render type is not set to Advanced Table (Legacy). Go to Table Configuration > Rendering Settings and switch to the correct mode. Save and refresh the preview.
- Merged cells are not showing in the live table
Check that you are viewing the table preview and not just the editor view. The editor shows raw data. The merge only renders in the preview and on the published page.
- The rowspan script is not combining any cells
Confirm that the cells being targeted contain exactly identical values, including spacing and capitalization. The script matches values as strings, so “Electronics” and “electronics” are treated as different values and will not merge.
- Merging is removing data from one of the cells
This is expected behavior for colspan in Advanced Mode. The #colspan# value replaces the data in that cell. Copy the data before applying the merge, or restructure the row so the important data is in the cell that remains visible.
Frequently Asked Questions
Can I merge cells in the free version of Ninja Tables?
The colspan method in Advanced Mode is available in the free version. The Drag and Drop builder’s visual cell merge is part of the Simple Mode builder, which is also available in the free version. The rowspan JavaScript method works in both free and pro versions since it uses the Custom JavaScript field.
Does merging cells affect table responsiveness?
Merged cells in Advanced Mode can affect how a table responds at smaller breakpoints, particularly if the merge spans multiple columns. It is worth testing your table at mobile widths after applying merges. The Drag and Drop builder handles this more predictably since its responsive settings are managed separately in the Responsive Table Design panel, where you can customize your table accordingly.
Can I merge cells in a table imported from CSV?
Yes. Once a CSV-imported table is built in Advanced Mode, you can apply #colspan# or the rowspan script to any cells. The import process does not restrict post-import editing.
Is there a limit to how many cells I can merge?
There is no set limit on the number of cells that can be merged. However, merging cells across very large spans can affect readability and responsiveness. Use merging to group related data, not to reduce visible structure.
Wrapping Up
A cluttered table is a trust problem. When every cell stands on its own regardless of whether it needs to, the table feels harder to read than the data actually is. Merging cells is one of the fastest ways to fix that without redesigning anything.
What both methods share is that neither requires you to touch HTML or write custom CSS from scratch. That is the practical advantage Ninja Tables brings to table design in WordPress. The tools are built into the plugin, the steps are short, and the result shows up in the preview before you publish anything.
Try Ninja Tables for free and see how much cleaner your tables can look with the right structure in place.
Ninja Tables– Easiest Table Plugin in WordPress


Add your first comment to this post