
WooCommerce Inventory Management: Why, How, What
Running a WooCommerce store can be challenging. Between production and marketing, there comes WooCommerce inventory management, one of the most important aspects of running an online store.
Fortunately, the process is not so complicated. Learning some basics of WooCommerce inventory management can help you ensure that your store is always ready for buyers.
After the history of WooCommerce, we covered how to get started with WooCommerce. And today in this article, we’ll cover the importance of WooCommerce inventory management to a well-run store. Then, we’ll cover an in-depth tutorial on the easiest and right way to do it.
Importance of WooCommerce inventory management
Monitoring your stockroom is a basic aspect of running a successful WooCommerce store. By maintaining an organized inventory, You can always be ready to cater to potential buyers or offer a wish list option if a product is out of stock, ultimately maximizing your potential profits.
Effective inventory management can also serve as a sales strategy. Knowing which products sell the fastest enables you to focus on your most profitable niche and avoid investing in items that are not performing well.
In addition, keeping an up-to-date record of your stock can prevent misunderstandings and incorrect spending. It is essential to calibrate the settings of your inventory management system to optimize its performance in your store.
Given the critical role that inventory management plays in the success of your business, it is advisable to familiarize yourself with these features early on to ensure long-term profitability.
An Introduction to WooCommerce inventory management
We’ll cover some basics before diving into the details.
Let’s discuss the global features of WooCommerce’s inventory management.
Navigate to WooCommerce from your WordPress dashboard. Go to Settings → Products → Inventory.
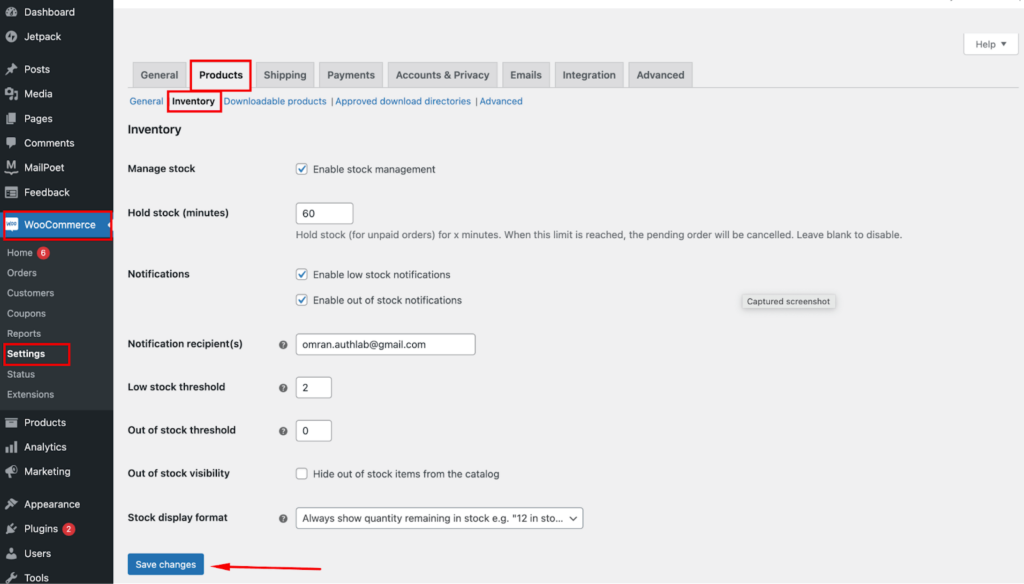
Make sure to check Enable stock management before beginning.
Next, here you can select how many minutes you’d like to Hold stock for. That pertains to orders that have been placed but remain unpaid. In that case, if the payment deadline is exceeded, any pending orders will be canceled automatically.
Next, you can also enable low or out-of-stock notifications.
The next notification recipient email setting, low stock, and out-of-stock threshold setting. And lastly, there’s a checkbox to decide Out of stock visibility. Enabling this will prevent shoppers from seeing items they can’t get.
Finally, determine how the inventory will show on the front end under the drop-down menu of the Stock display format.
Click the Save Changes when you’re ready.
There are also individual product stock settings. If you ever want to edit on a stock-by-stock basis, simply Go to Products > All Products and click to Edit. Scroll down to the product data box and click Inventory.
Control stock status for individual products and variants
WooCommerce comes with four types of products.
- Simple products – Exactly as the name it’s the most basic type of product in WooCommerce. You can add individual, shippable products with no unique variations or groupings here.
- Variable products – Similar to simple products, but contains different variations like color or size. Each of these variations is essentially a product with its stock number and SKU, but it’s grouped under one parent product.
- Grouped products– The products that are sold in a bundle or collection. This is distinct from upsells and cross-sells.
- External/affiliate products – The products that are affiliated and listed on your website and you take a commission off them, and part of the cut goes to someone else.
There are also downloadable products that remove the shipping aspect and sell virtual items in your store. You will not likely need to worry about stock tracking for this type of product.
So, you are all set with the basics, let’s go through how you can assign individual stock status to simple or variable products.
Managing stock status for simple products
A product without any custom options is considered a simple product. This can include a single version of a book or collectible, for instance. Most of the items you offer likely fall into this category.
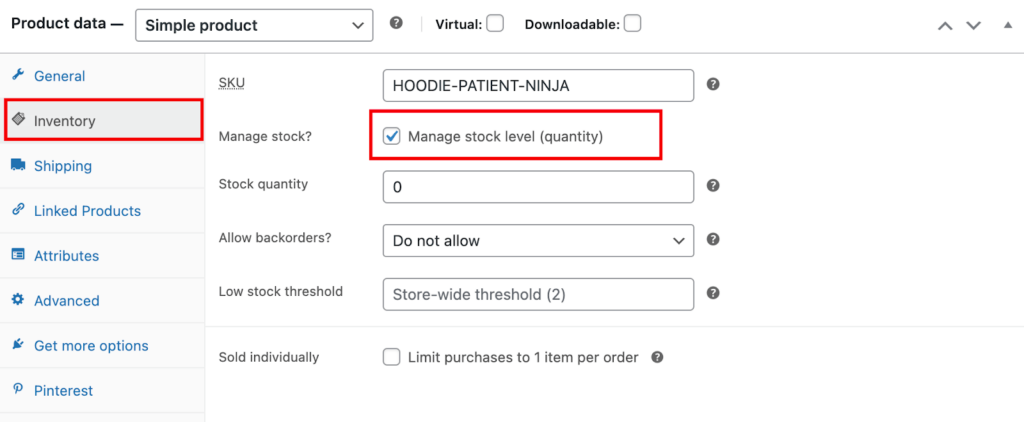
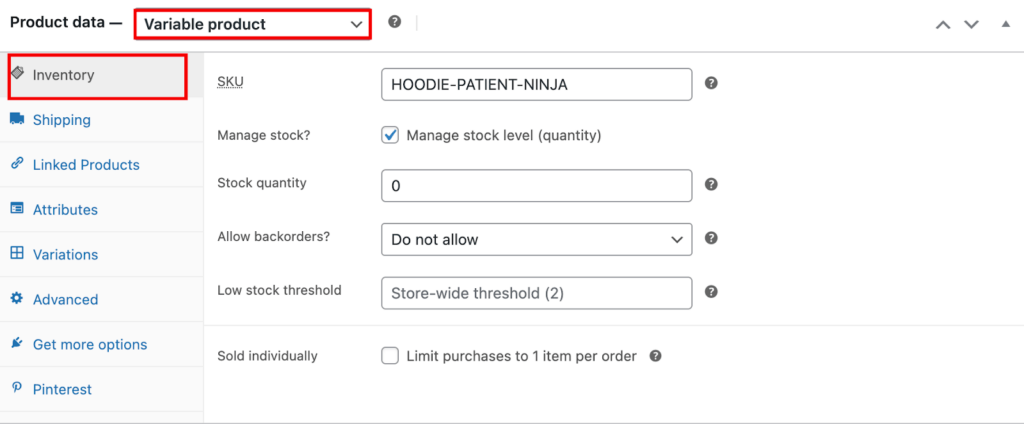
To begin, open the simple product you wish to adjust and navigate to the Inventory tab located within the Product data box.
Here is a box labeled Manage Stock. Make sure to check that option to get started. This is required to enable your needed options. After that, you can move on to the basics of WooCommerce inventory management for simple products.
If you want to manage individual stock settings for each product, you have to check the Manage stock level (quantity). Here’s what each of these settings means:
- SKU – Set a product SKU number.
- Stock quantity – Manually set stock numbers.
- Allow back orders – Allow customers to order products when they’re out of stock.
- Low stock threshold – Change the low stock threshold set on the global settings screen for this product.
- Sold individually – Allow customers to only buy one product at a time.
The field settings can vary a bit, don’t worry if your view looks different from the given example. It’s important to ensure all the necessary fields are completed according to your preferences.
Managing stock status for variable products
That’s the section where you’ll find it’s not so easy to manage. Because each iteration of a variable product can have different stock, traits, and prices.
For variable products, you have to manage stock at multiple levels. You have to maintain the product level and variation levels.
Let’s illustrate the difference, assume you sell a t-shirt in Red, Green, and Blue colors.
And let’s say you have a total of 15 shirts and five shirts in each color.
- Managing at the product level – Here, you can set the stock level to 15 for the product. When a customer purchases a red one, the inventory level for the product will decrease to 14. However, you won’t be notified that you only have four red shirts left.
- Managing at the variation level – You would set the stock for each variation to 5. If someone purchased a red one, the stock status for the red variation would drop to 4, which lets you know precisely how many of each variation you have left.
If you are dealing with variable products, it’s advisable to handle the stock at the variation level.
| Image | Name | Category | Price | Quantity | Buy |
|---|---|---|---|---|---|
 | Pumpkin Spice (Sweet) | Decor | $20.00 | | |
 | White Tea & Wisteria Scent (Calm) | Decor | $12.00 | | |
 | Magnolia Scent (Fresh) | Decor | Original price was: $15.00.$13.00Current price is: $13.00. | | |
 | Orange-Marigold Scent (Fresh) | Decor | Original price was: $6.00.$4.00Current price is: $4.00. | | |
 | Coffee candle (Sweet) | Decor | Original price was: $10.00.$8.00Current price is: $8.00. | | |
 | Blue Hoodie (Zipper) | Hoodies | Original price was: $40.00.$35.00Current price is: $35.00. | | |
 | Hat | Hat | Original price was: $20.00.$15.00Current price is: $15.00. | | |
 | T Shirt | Half sleeve | $45.00 | | |
 | Album | Music | $15.00 | | |
| Beanie with Logo | Accessories | Original price was: $20.00.$18.00Current price is: $18.00. | | ||
| T-Shirt with Logo | Tshirts | Original price was: $10.00.$8.00Current price is: $8.00. | | ||
 | Single | Music | Original price was: $20.00.$18.00Current price is: $18.00. | | |
 | Pants | Shorts | $15.00 | | |
 | Polo | Tshirts | $20.00 | | |
 | Long Sleeve Tee | Tshirts | $25.00 | | |
 | Hoodie with Zipper | Hoodies | $45.00 | | |
 | Hoodie with Pocket | Hoodies | Original price was: $45.00.$35.00Current price is: $35.00. | | |
 | Sunglasses | Accessories | $90.00 | | |
 | Cap | Accessories | Original price was: $18.00.$16.00Current price is: $16.00. | | |
 | Belt | Accessories | Original price was: $65.00.$55.00Current price is: $55.00. | | |
 | Beanie | Accessories | Original price was: $20.00.$18.00Current price is: $18.00. | | |
 | T-Shirt | Tshirts | $18.00 | | |
| Hoodie with Logo | Hoodies | $45.00 | | ||
 | Tank Top | Tanktop | Original price was: $45.00.$40.00Current price is: $40.00. | |
The variable WooCommerce table is made with Ninja Tables.
*No order will be placed
However, there is one exception to this rule. When you sell variable products that have a shared base item. For instance, suppose you offer a water bottle that you customize by adding a sticker based on the buyer’s variation preference.
In such a case, since the base water bottle is identical for all variations, it would be more practical to manage the stock at the product level. To achieve this, you can navigate to the Inventory tab of the Product data box, just like simple products.
Once there, tick the box labeled Enable stock management at the product level, and then input the same details as outlined above.
If you want to handle the stock at the variation level, you can access the Variations tab within the Product data box.
Select one of the variations, and then tick the box labeled Manage stock. This action will reveal several new options that allow you to manage the stock status for that particular variation exclusively.
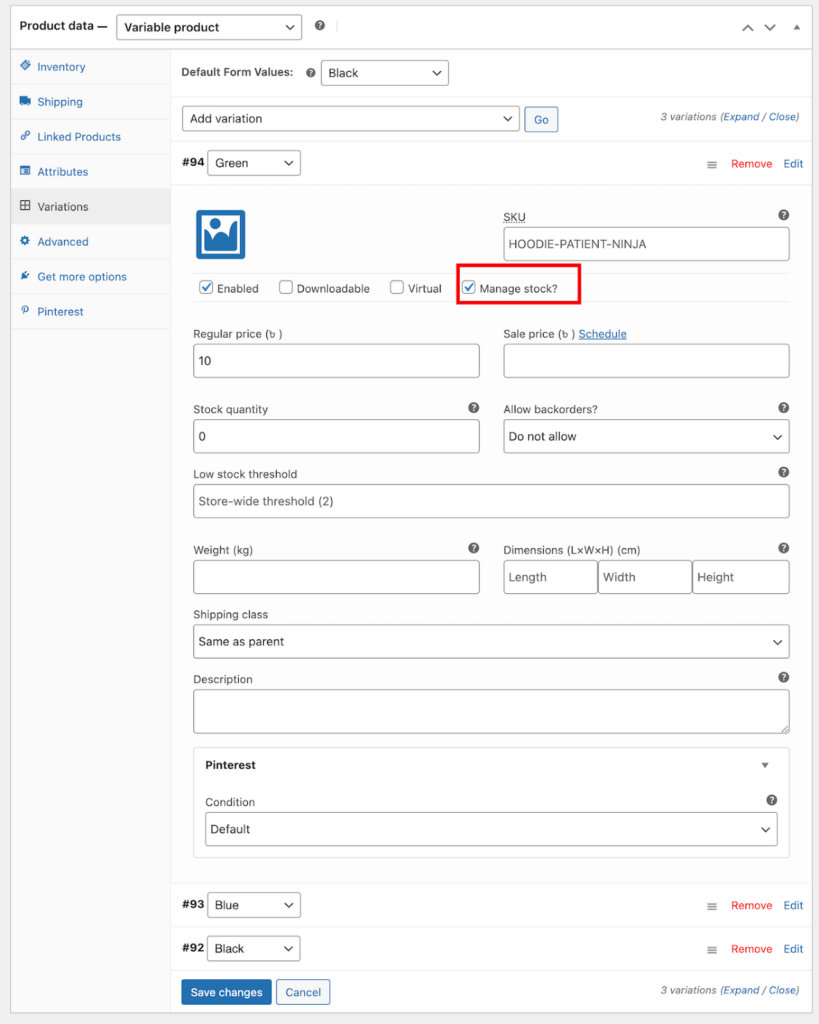
You can do the same procedure for other variations to regulate their stocks as well.
How to Keep Inventory Updated
WooCommerce will automatically deduct inventory from your products when you sell them by enabling the correct settings.
You can do this by turning on Enable stock management.
Go to WooCommerce from the dashboard. Go to WooCommerce Settings > Product > Inventory. Then for each product, you can turn on Enable stock management in the products’ Edit pages and set the stock level.
Whenever you make a sale, WooCommerce will subtract from this figure and update your product’s stock status accordingly, setting it to low or out of stock as necessary.
However, the downside is that you will have to manually adjust the numbers whenever you receive a new shipment because WooCommerce is only capable of incrementing stocks down, not up.
Fortunately, this limitation can be extended with add-ons, but the basic tool lacks this functionality.
WooCommerce inventory management at a bulk
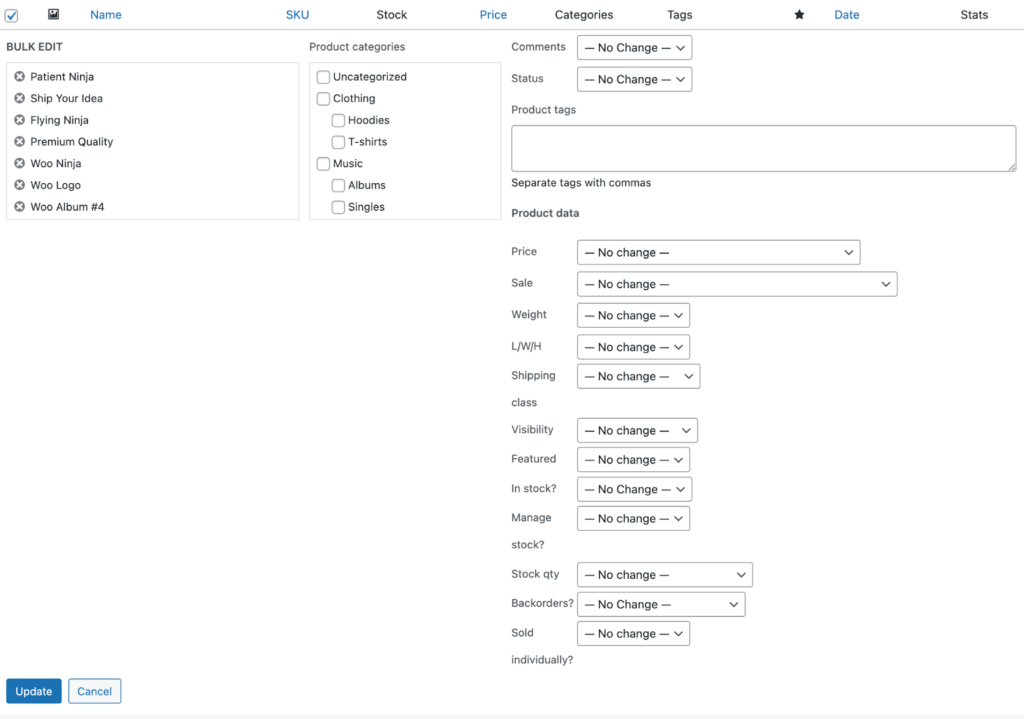
Activating stock management for your products or updating stock status manually can be a time-consuming process, but luckily, there are convenient built-in bulk editing features available.
To use these features, navigate to the Products > All Products page, and select multiple products by ticking their checkboxes or select all by clicking the top checkbox. Then, change the Bulk actions dropdown to Edit, and click on Apply.
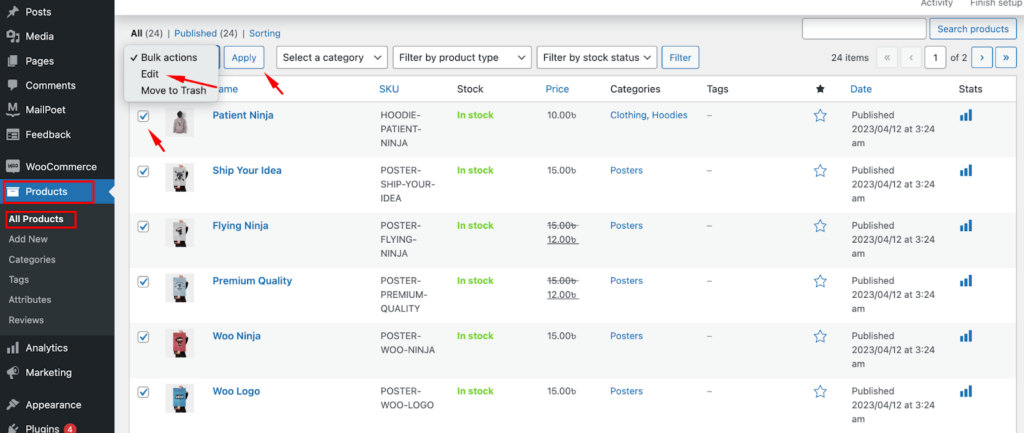
Within the bulk editing menu, you can access the Manage Stock. dropdown and set it to Yes to enable individual stock management for all your products at once.
Once activated, you can also modify the Stock qty setting in bulk, either by specifying an exact quantity or adjusting it incrementally by a certain amount.
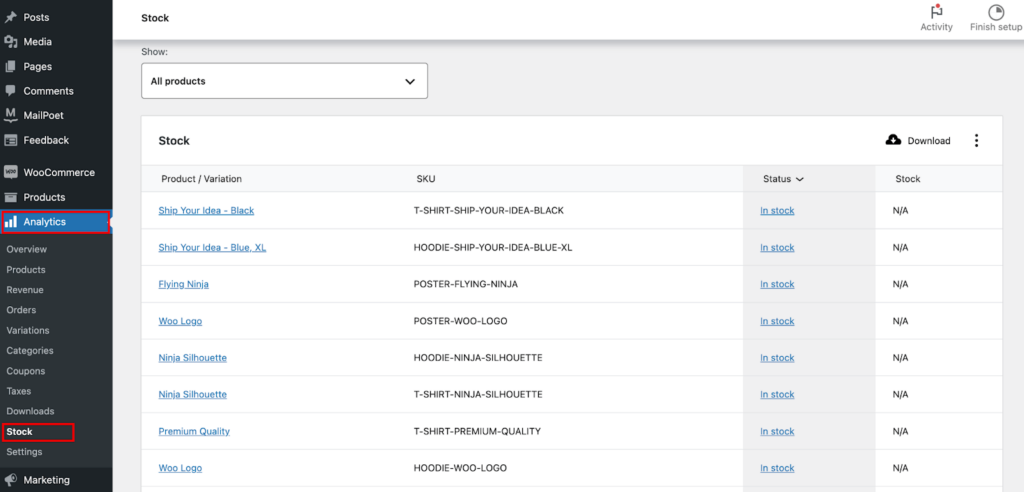
How to View Stock Status Reports
WooCommerce comes with plenty of analytics and reports that you can utilize to keep track of your inventory more effectively. One such tool is the Analytics > Stock page, which provides an overview of your stock levels and in-stock status.
You can sort this data by clicking on Product/Variation, SKU, Status, or Stock and reverse the order by clicking on the same field again.
WooCommerce Reports
Finally, one of the amazing features of WooCommerce. There a way to keep an eye on your store’s inventory, though, is to use WooCommerce’s built-in stock reports.
You can check this out by going to WooCommerce → Reports → Stock:
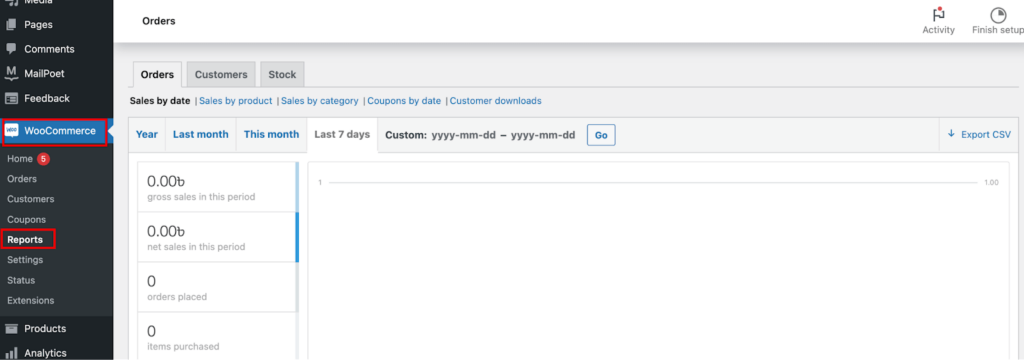
Here, you can see three categories of reports: those for low-stock, out-of-stock, and most-stocked products. This is a quick way to easily visualize your store’s performance and see which products require your attention.
Get started with WooCommerce inventory management today
At times, WooCommerce inventory management can appear like a maze. Although comprehending the various methods to arrange your stock may seem intimidating, it is a crucial task. Thankfully, you can regulate your inventory by understanding the interface.
In this article, we tried to cover all the important parts of WooCommerce inventory management, including:
- Configuring built-in inventory features that apply across the store.
- Advanced view of stock levels for variable or simple products.
- Utilizing built-in reports in WooCommerce to monitor inventory status.
For additional ways to optimize your store, please refer to our complete compilation of the finest WooCommerce plugins. If you have any inquiries regarding WooCommerce inventory management, please feel free to leave a comment in the section below.
Finally, if you are sure about WooCommerce business, don’t forget to check out Ninja Tables. It’s the best WooCommerce product table plugin that lets you showcase your products in a tabular format.


Add your first comment to this post