A Beginner’s Guide to Ninja Tables Drag and Drop Builder

A perfectly organized and smart-looking website is hard to find. Displaying data in a table makes things much easier for the audience. With a WordPress drag and drop table plugin, your website can look the most organized.
And we bring Ninja Tables for that. Create tables in no time with the drag-and-drop table element function. It’s like a table builder in a table builder!
How to use Ninja Tables drag and drop table feature
The recent update tweaked and fixed many previous features of this table plugin. However, adding the “Drag & Drop” module was a game-changer!
Creating advanced and stylish tables with the feature-packed plugin was already a massive deal. But users can now also create simple tables by dragging or repositioning table cell elements.
First of all, install and activate Ninja Tables on your WordPress dashboard.
P.S.- “Drag and Drop” is available in the free version
(Some cell elements are pro)
You can create a drag and drop table by picking any of the following options.
Manually create a table with drag & drop
Step 1: Click the “+/-” buttons or type the desired numbers to add rows and columns
Step 2: Click “Create”
Step 3: Pick and drag any table element to drop on the table
You can drop multiple elements in one cell.
Import CSV/JSON
This feature is amazing because you can edit any table with the drag-and-drop options when you import its CSV/JSON file.
- Drop the imported file to upload
- Paste the URL of the table you want to import (Pro)
If you have a WooCommerce product table made with advanced Ninja Tables features, you can import the table here and customize it with the star rating element or buttons.
Edit prebuilt table templates
Finally, here’s the fun part!
No need to break a sweat to build tables from scratch. Ninja Tables drag and drop gives you four prebuilt templates you can customize per your requirement.
- Pricing Tables
- Comparison Tables
- Employee Tables
- Schedule Tables
The tables are made with dummy data. You can change everything, including row/column numbers, cells, colors, etc.
Customization features of Ninja Tables drag & drop table
When you enter the drag-and-drop editor, you’ll find three primary tabs-
Other than these, two buttons sit on top of the table-
Elements
| General table elements | Advanced table elements |
| Text | Styled list |
| Button | Ribbon |
| Icon | Progress |
| Rating | Text icon |
| List | |
| HTML | |
| Shortcode | |
| Image |
Settings
General |
|
Background |
|
Sticky |
|
Accessibility (Table role) |
|
Border |
|
Global Style |
|
Export Table |
|
Responsiveness
| General | Enable responsive table |
| Mode options | For mobile, tablet, & desktop Top row as header Static top row |
Manage cells
Click on a cell to get cell-specific options.
Hold the “Shift” button on your keyboard and select multiple cells to merge them together. Do the same to split cells.
The selected cell will be highlighted for you to manage anything about it.
Other than managing stuff like merge/split or row/column settings, you can also select a column to add a background highlight on it.
Simply click on a column and pick the box shadow color from the menu.
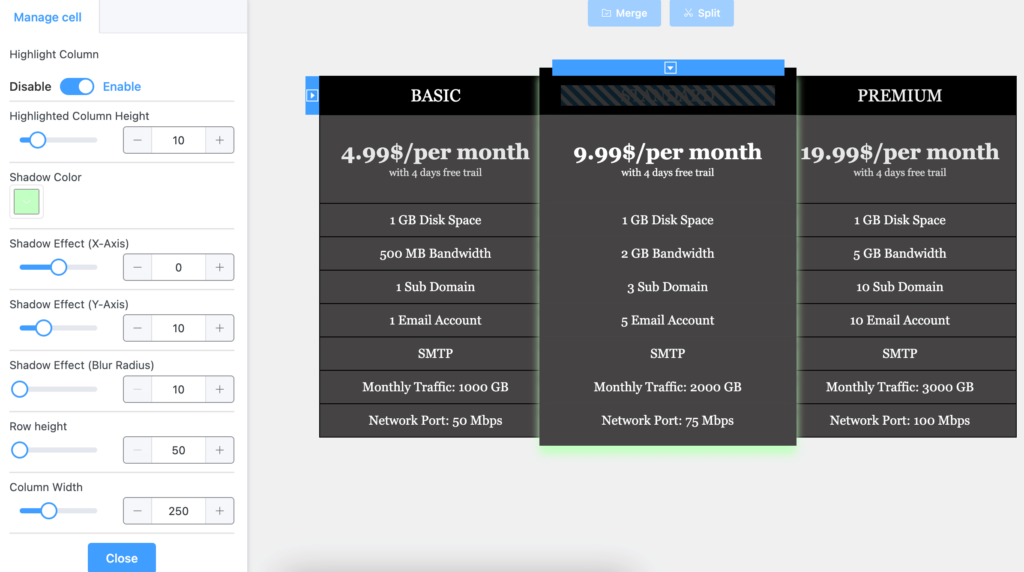
Customize the pricing tables for your webstore fast!
Background
This is a quick-designing way, so you don’t need to go to settings and change colors.
Ninja Tables features: Quick overview
As we’ve mentioned, the “drag-and-drop” feature is available in free and pro versions of Ninja Tables. It’s an extra table creation mode and contains some exclusive features of its own. For example, star rating, progress, list items, etc.
Get a quick overview of all the features below.
| Features | Pro | Free |
|---|---|---|
| Unlimited data | ||
| Multimedia | ||
| WooCommerce product table | ||
| Google Sheets Auto-sync | ||
| Drag & drop table builder | ||
| Fluent Forms integration | ||
| Custom color scheme | ||
| Import-export | ||
| Conditional formatting | ||
| Transform value | ||
| WP posts | ||
| Pre-built templates | ||
| Custom filter | ||
| Select Field | ||
| Cell merge | , (Drag and Drop) | |
| Stackable tables | ||
| Ribbon, icon, styled list elements | ||
| Charts | ||
| Sticky column/header | ||
| Shortcode in cells | ||
| HTML table header | ||
| Single column color | ||
| Button/Link | , (Drag and Drop) | |
| Lightbox | ||
| Column width | ||
| Responsive breakpoints |
Powered by Ninja Tables
And there’s more to this plugin if you know your way around it.
Check out the docs or learn the different ways to create a table online.
Finishing Notes
Ninja Tables is already a fully customizable and feature-packed table plugin. And “Drag and Drop” is a bonus addition to the menu. This entire plugin gives you maximum flexibility and customizing options to create smart and responsive tables in no time!
With or without this drag-and-drop function, Ninja Tables is the best WordPress table plugin out there! But this new addition definitely makes it more irresistible.
Drag and drop table elements to create smart online tables and stop worrying about big data arrangement.

Ninja Tables– Easiest Table Plugin in WordPress



How do I use the drop
Hi Shana. You can find the Drag & Drop mode from the table creation menu. Click “Add table” and the menu will appear. Select Drag & Drop, choose your table columns/rows, or pick a template to edit. The elements in this mode can be dragged and dropped on the table cells however you like. Hope your confusion is cleared. Thanks!