2 Easy Ways to Merge Cells in WordPress Tables (+Pro Tips)

When it comes to designing a table, merging cells is like teleportation that shifts your data presentation game from chaos to clarity.
Not knowing how to merge cells in WordPress tables or HTML tables, increases the risk of your data visualization becoming a jumbled mess!
So, don’t let your data suffer this fate. At least, if you think about your audience, don’t showcase cluttered data!
How to merge cells in a table?
Going through this article will help you learn the tricks of combining cells in a table using Ninja Tables: the best table builder plugin.
What does it mean to merge cells?
Merging cells in a table is mainly combining two or more adjacent cells and converting them into one large single cell.
Moreover, merging eliminates the borders between the cells, making a unified and visually appealing layout. You can effectively span content across multiple columns or rows by conjoining cells.
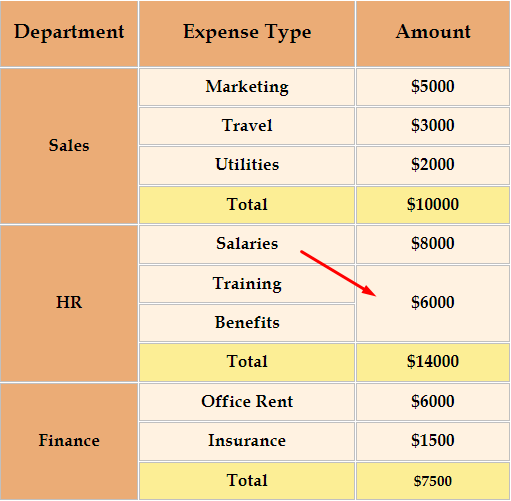
For example, say you’re creating a sales report for a business and want to sum the department-wise expense. You might need to merge the columns/rows to present the information clearly.
Here’s a sneak peek of it:
How to merge cells in WordPress tables: Ninja Tables
In WordPress, HTML table merge cells require coding skills, but there’s a simple way to do it.
Ninja Tables can merge cells in a table in two simple methods. You can effortlessly merge columns or rows without compiling any HTML/CSS codes.
Let’s find out how.
Method 1: Ninja Tables Advanced table
Advanced table AKA default table mode in Ninja Tables can merge two adjacent cells horizontally in the simplest possible way.
Here’s how cell merging in the advanced table works:
- Colspan
- Rowspan
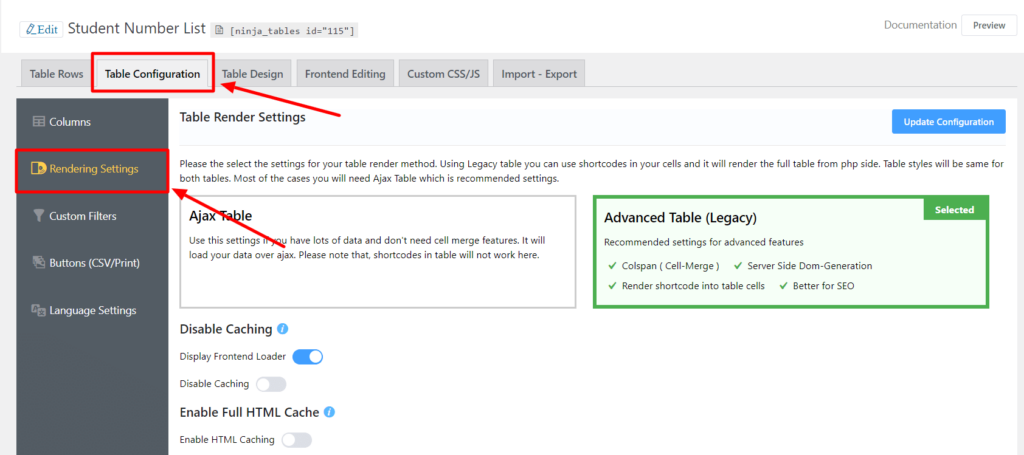
Set your table render type to Table as Advanced Table (Legacy) for the cell merge feature to work.
Table Configuration → Rendering Settings → Advanced Table (Legacy)
Colspan: Merge columns
The ‘colspan’ attribute specifies the number of columns that should span horizontally. This allows you to create a larger horizontal space in a table by merging multiple cells.
But, here’s the best part – no coding is required when using colspan in Ninja Tables!
In Ninja Tables, you will add #colspan# as a cell value and the cell will merge with its neighboring cells.
Let’s show you the step-by-step guide:
Step 1: First create a new table or select an existing one. Here, we’ve selected our existing ‘Employee Table’.
Step 2: Say you want to combine ‘Job Position’ and ‘Employee ID’ in the 8th row and merge the 1st and 5th rows to create 2 alternate headers.
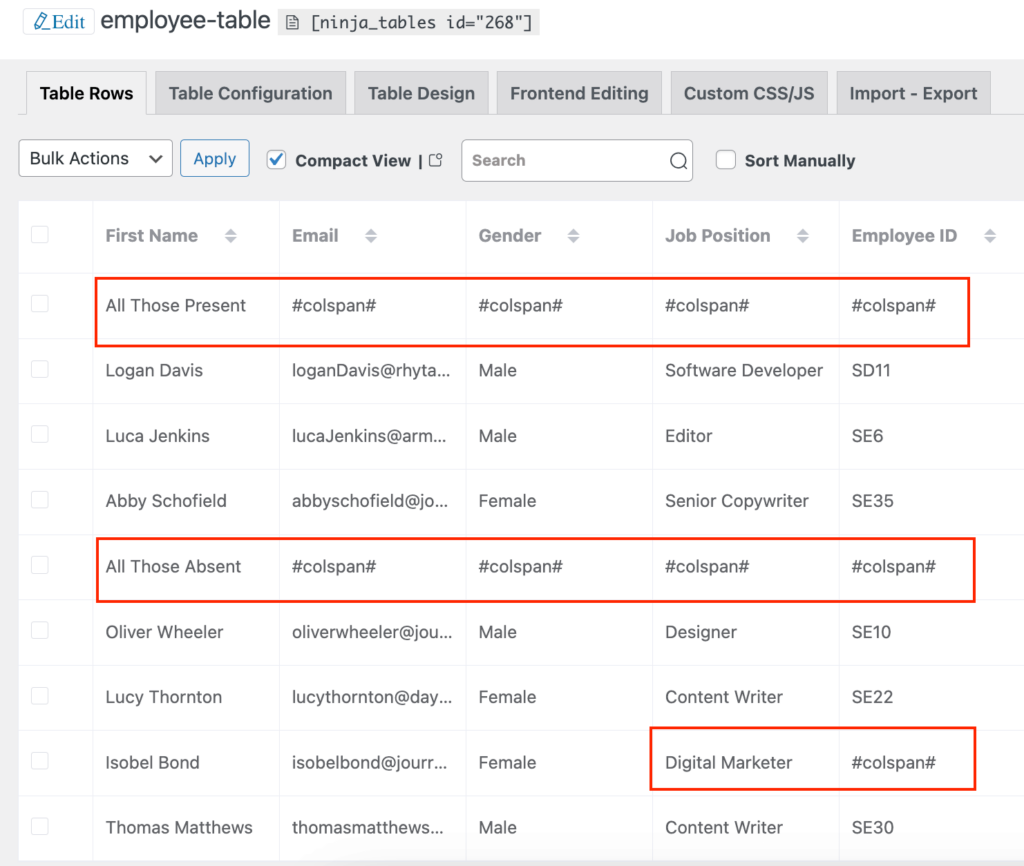
Step 3: Cells in Ninja Tables offer an Excel-like editing experience. Simply type “#colspan# in the cell you want to merge.
Alternatively, find the pencil icon on the right side of each row, and click on it to edit. Or edit row cells from the Table Configuration panel.
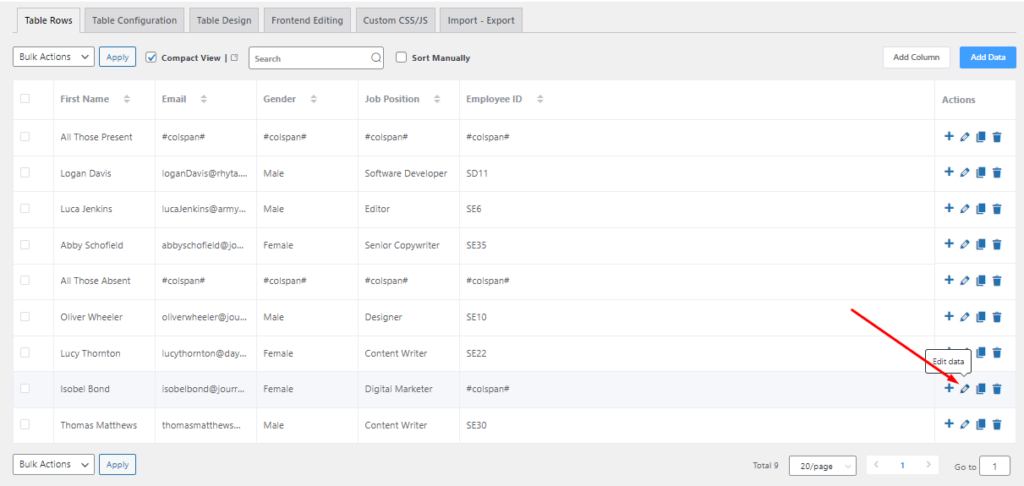
Step 4: As you can see in the picture below, the table columns are merged together with their neighboring column(s) to create one large cell.

Make sure you are viewing the table in the preview panel to see how it looks after using the #colspan# attribute.
Wait, there’s more!
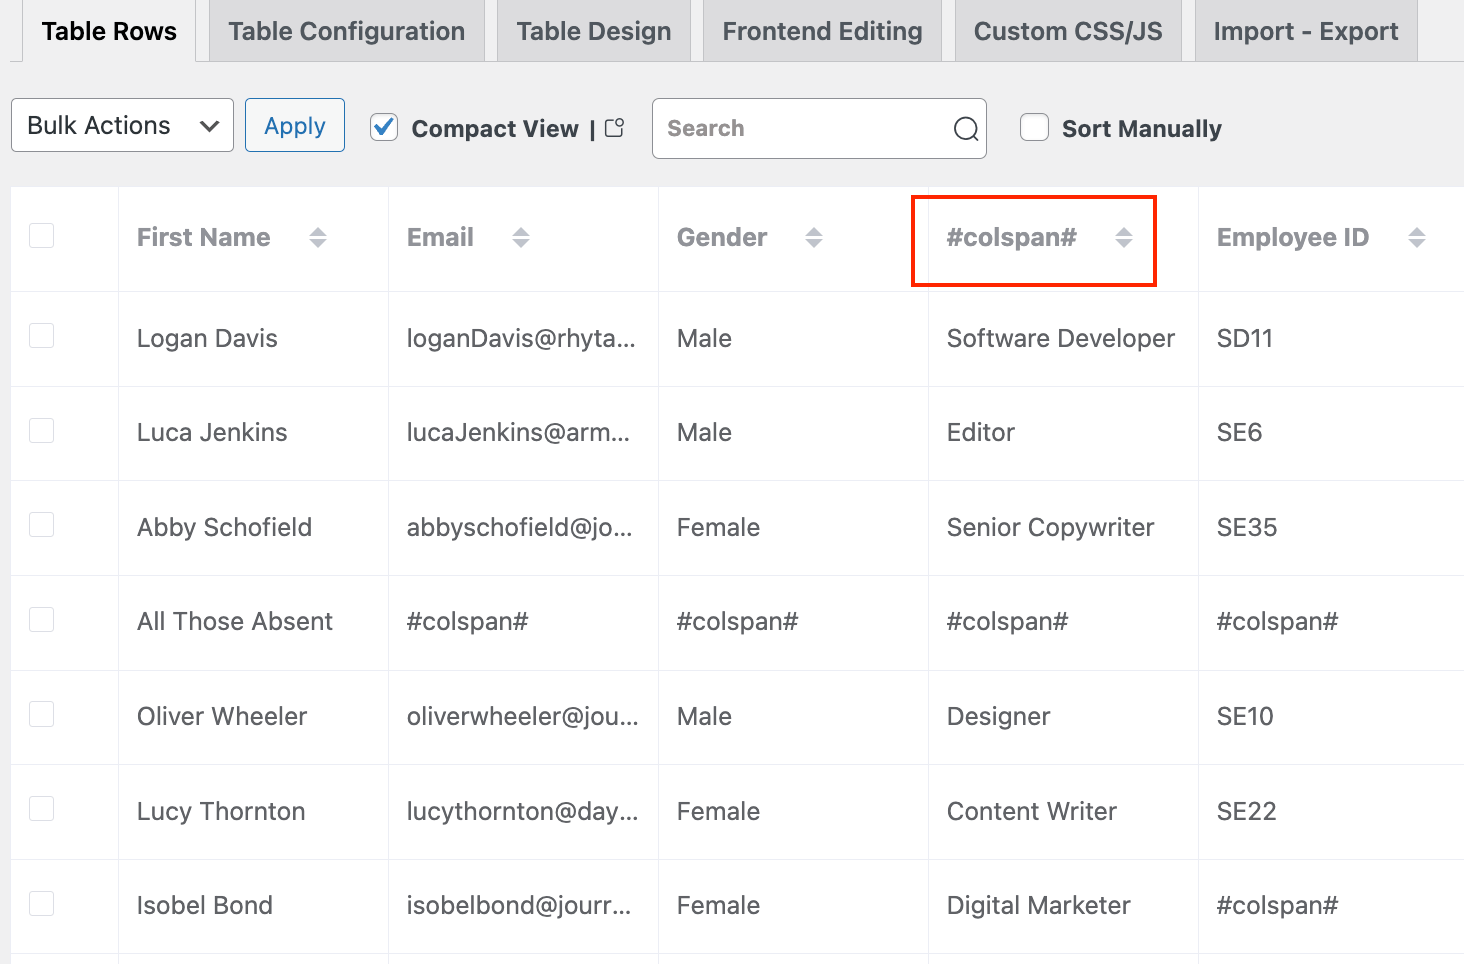
You can also merge existing table headers. Just add #colspan# in your desired column title, and it will merge the header with the previous one.
Rowspan: Merge rows
The name ‘rowspan’ hints at its purpose – to combine rows with identical data, making it a powerful attribute for table merging.
Here’s how you can bring out the potential of this attribute in Ninja Tables:
Step 1: Choose a table with identical row values. We’ll use the same table as before, with identical data in the ‘Gender’ column.
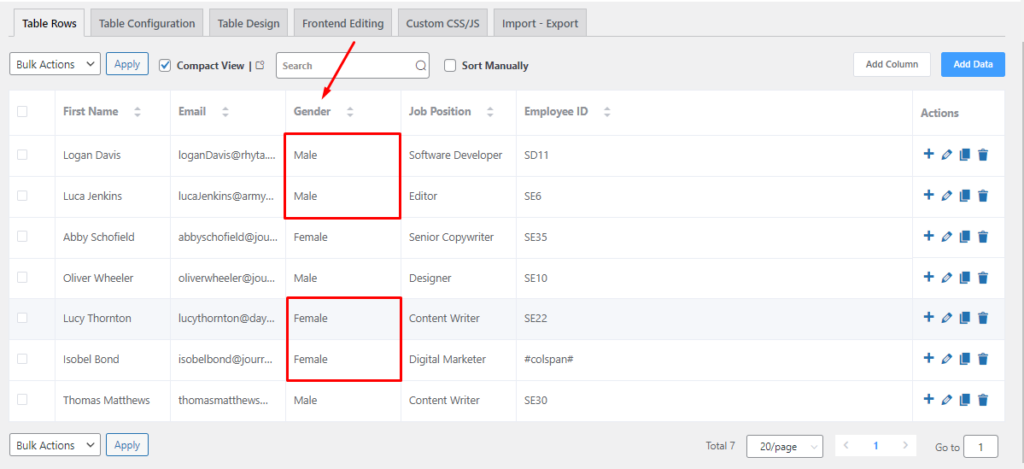
Step 2: Head to the Custom CSS/JS tab, and move to the ‘Custom Javascript‘ panel. Paste the JS code here and hit the Save Custom Javascript button.
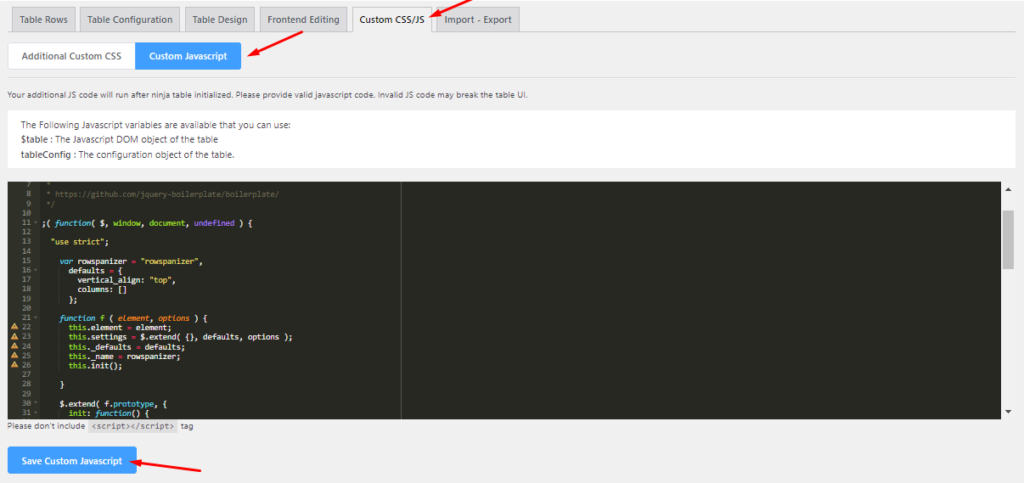
Step 3: After the custom javascript code is saved, it will be executed and you can view the update in the preview panel.

Thus, your rows will be neatly merged as desired!
Method 2: Ninja Tables Drag and Drop Table
Simple table also known as “drag and drop” table – helps you build and customize tables in less than 5 minutes! It is a simple and convenient module that differentiates Ninja Tables from other table builder plugins.
Likewise, cell merging/splitting in this mode is one of the easiest functions.
Step 1: Create a new table or choose an existing data table.
Step 2: Click on the “Manage Cells” option, now holding “SHIFT” select the cells you want to merge.
Step 3: When you’re done selecting click on the merge button at the top of the table.
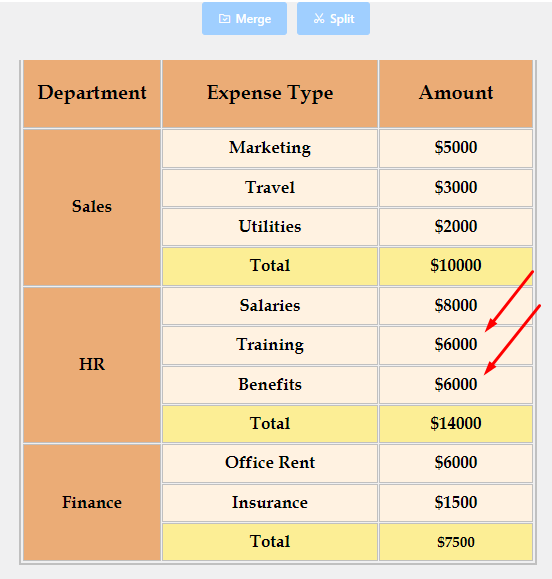
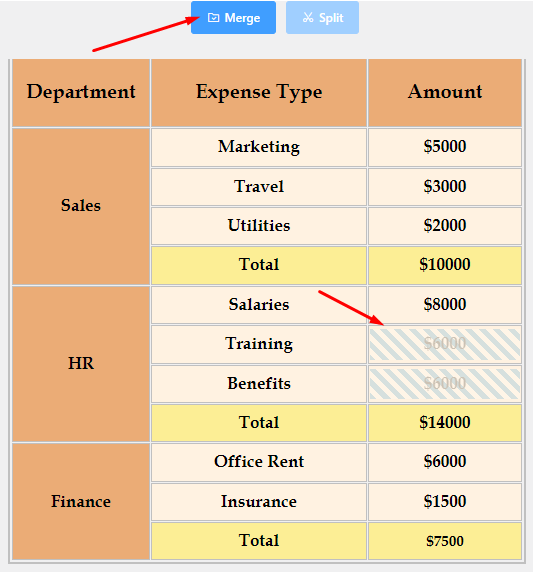
Step 4: Lastly, hit the save table button to keep the updates.
Combine table cells horizontally or vertically, however you want.
Pro Tips: Merging cells in a table best practices
Since you’ve reached the end of this article, we can assume you’ve already acquired the skills of how to merge table cells.
But, to gain professional-level accuracy in designing a table the right way, we’ve listed some best practices for you while merging multiple cells.
So, behold the Pro Tips for merging cells like a pro:
- Let go of the clutter – merge cells to declutter your data presentation.
- Try Advanced Table for larger data tables with complex customization needs.
- While merging headers, ensure the merged header cells align with the content.
- Always ensure responsive tables, even with multiple cells merged.
- Use subtle background color or border styling to distinguish merged cells.
Last Thoughts
The art of merging cells in a table is one of the surefire methods for effective data visualization. By skillfully combining cells, you can present data clearly, and enhance the overall user experience.
Merge cells in WordPress tables using Ninja Tables and save your table data visualization from decluttering.
📌 See a comprehensive guide on how to center a table with CSS
And, don’t forget to apply the Pro Tips for professional-level accuracy and style.

Ninja Tables– Easiest Table Plugin in WordPress





Add your first comment to this post