
Ninja Tables has several custom settings options to create a table. Basic Settings is where you can establish a column with basic choices like column name, column key, data type, and responsive breakpoints.
Let’s have a look at this simple guide to learn how to create a column with these Basic Settings.
Column Basic Settings in Ninja Tables #
- Go to a table created by Ninja Tables first and then hover over any column to find the settings icon.
Or,
- You can move to the Table Configuration tab and click the edit icon. Select Basic Settings.
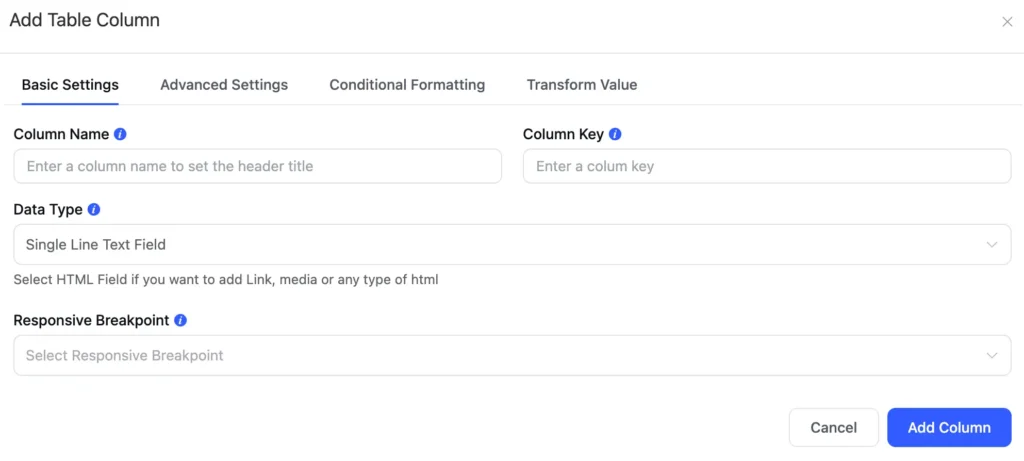
- Here you will notice various basic options like Column Name, Column Key, Data Type, and Responsive Breakpoints.
Column Name #
To set the header title for the specific column, use this option to provide the name. This field must be filled out. One more important thing is that the Column Name is HTML-supported.
Column Key #
The column key is for data mapping, exporting, and importing table data. The column key will generate automatically when you enter the column name for your table.
Data Type #
Various Data Types are available to construct columns according to your needs. For example, text area, buttons, lightbox, HTML, etc. To learn more, go to this documentation, and you will know better.
Responsive Breakpoints #
Ninja Tables gives you the option to choose among 6 distinct breakpoints.
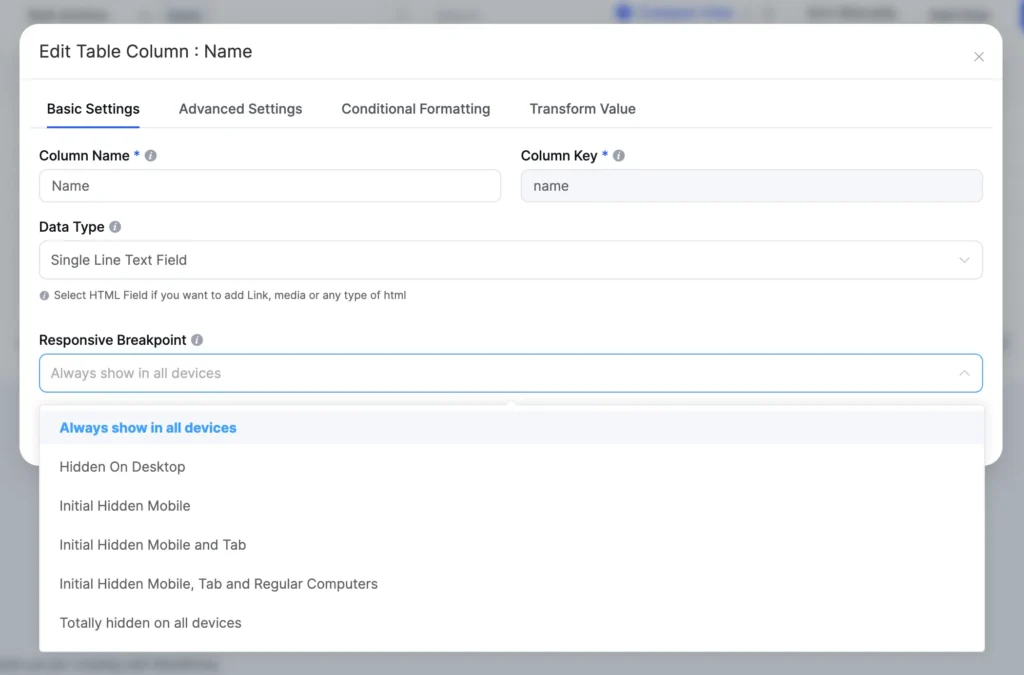
- Always show in all devices
- Hidden on desktop
- Initial hidden mobile
- Initial hidden mobile and tab
- Initial hidden mobile, tab, and regular computers
- Totally hidden on all devices
You can decide what column you don’t want to appear on what device. When activated, the table will show a “+” sign and the hidden column will appear if you click it.
Here’s an example table
| Name | Position | Office | Age | Start date | Salary |
|---|---|---|---|---|---|
| Zorita Serrano | Software Engineer | San Francisco | 56 | 2012/06/01 | $115,000 |
| Zenaida Frank | Software Engineer | New York | 63 | 2010/01/04 | $125,250 |
| Yuri Berry | Chief Marketing Officer (CMO) | New York | 40 | 2009/06/25 | $675,000 |
| Vivian Harrell | Financial Controller | San Francisco | 62 | 2009/02/14 | $452,500 |
| Unity Butler | Marketing Designer | San Francisco | 47 | 2009/12/09 | $85,675 |
| Timothy Mooney | Office Manager | London | 37 | 2008/12/11 | $136,200 |
| Tiger Nixon | System Architect | Edinburgh | 61 | 2011/04/25 | $320,800 |
| Thor Walton | Developer | New York | 61 | 2013/08/11 | $98,540 |
| Tatyana Fitzpatrick | Regional Director | London | 19 | 2010/03/17 | $385,750 |
| Suki Burks | Developer | London | 53 | 2009/10/22 | $114,500 |
| Sonya Frost | Software Engineer | Edinburgh | 23 | 2008/12/13 | $103,600 |
| Shou Itou | Regional Marketing | Tokyo | 20 | 2011/08/14 | $163,000 |
| Shad Decker | Regional Director | Edinburgh | 51 | 2008/11/13 | $183,000 |
| Serge Baldwin | Data Coordinator | Singapore | 64 | 2012/04/09 | $138,575 |
| Sakura Yamamoto | Support Engineer | Tokyo | 37 | 2009/08/19 | $139,575 |
| Rhona Davidson | Integration Specialist | Tokyo | 55 | 2010/10/14 | $327,900 |
| Quinn Flynn | Support Lead | Edinburgh | 22 | 2013/03/03 | $342,000 |
| Prescott Bartlett | Technical Author | London | 27 | 2011/05/07 | $145,000 |
| Paul Byrd | Chief Financial Officer (CFO) | New York | 64 | 2010/06/09 | $725,000 |
| Olivia Liang | Support Engineer | Singapore | 64 | 2011/02/03 | $234,500 |
| Michelle House | Integration Specialist | Sidney | 37 | 2011/06/02 | $95,400 |
| Michael Silva | Marketing Designer | London | 66 | 2012/11/27 | $198,500 |
| Michael Bruce | Javascript Developer | Singapore | 29 | 2011/06/27 | $183,000 |
| Martena Mccray | Post-Sales support | Edinburgh | 46 | 2011/03/09 | $324,050 |
| Lael Greer | Systems Administrator | London | 21 | 2009/02/27 | $103,500 |
| Jonas Alexander | Developer | San Francisco | 30 | 2010/07/14 | $86,500 |
| Jennifer Chang | Regional Director | Singapore | 28 | 2010/11/14 | $357,650 |
| Jennifer Acosta | Junior Javascript Developer | Edinburgh | 43 | 2013/02/01 | $75,650 |
| Jenette Caldwell | Development Lead | New York | 30 | 2011/09/03 | $345,000 |
| Jena Gaines | Office Manager | London | 30 | 2008/12/19 | $90,560 |
This is how easily you can configure the Basic Settings of a table in Ninja Tables.


is it possible some columns appear only in specific roles?
Hello Costas,
Yes, you can do it easily using Ninja Tables advanced shortcodes. You can check this doc: https://ninjatables.com/docs/advanced-shortcode/
For any other advanced assistance please open a support ticket from here: https://wpmanageninja.com/support-tickets/
Can the user select the columns he wants to display?
Hi Andrea. You can hide the columns you don’t want to show. See the “Responsive Breakpoint” option for the specific column. Once chosen, all other columns will be displayed except this one.
Hello! When choosing the mode: initially hidden on mobile, tab and dektop, is there an option to allow only one row to be expanded at a time, so that when another row opens, the previously opened one closes?
Hello Daniel,
Thank you for reaching out. There is not any default option for the effect you wanted in the above comment. But there can be some work around. Contact our support team https://wpmanageninja.com/support-tickets/, they can help you with this query .
Thanks.