
Google Sheets integration with Ninja Tables is certainly the plugin’s one of many useful features. This combination is actually an auto-sync where data from Google Sheets are automatically fetched and displayed in a customized table.
Moreover, the data in Ninja Tables will automatically update if there are any changes in the Google Sheets. Google takes a minimum of 5 minutes to update the data on the web.
Data from Google Sheets to WordPress Table #
How to display Google Sheets data entries in a WordPress table?
We’ll explain the process here, using the following dummy Google Sheet.
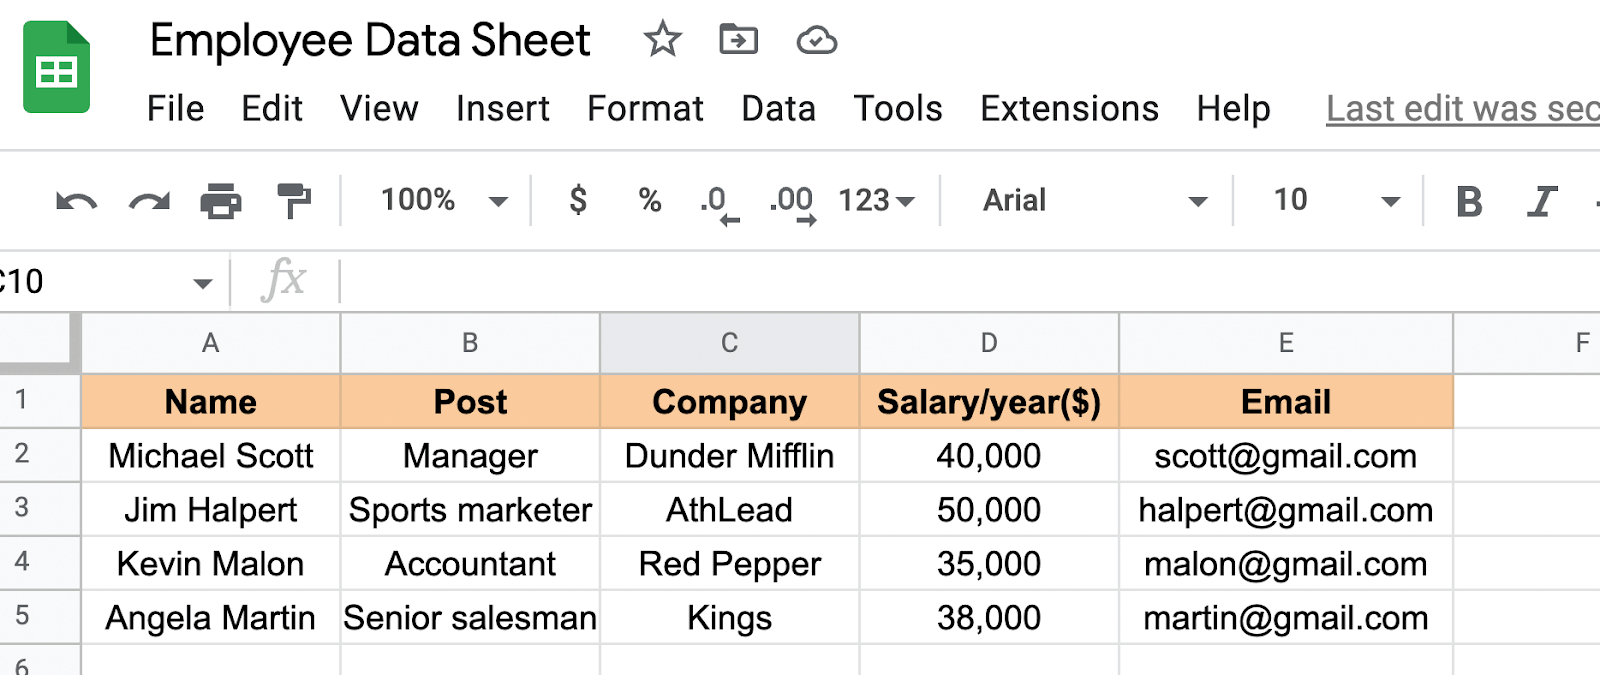
- We will import this data table to Ninja Tables. To do this, go to the Ninja Tables dashboard located in the sidebar. Then, go to the Add Table button from the top right corner of the dashboard.
- After that, a pop-up box will be visible. Choose Connect Google Sheets from the sidebar.
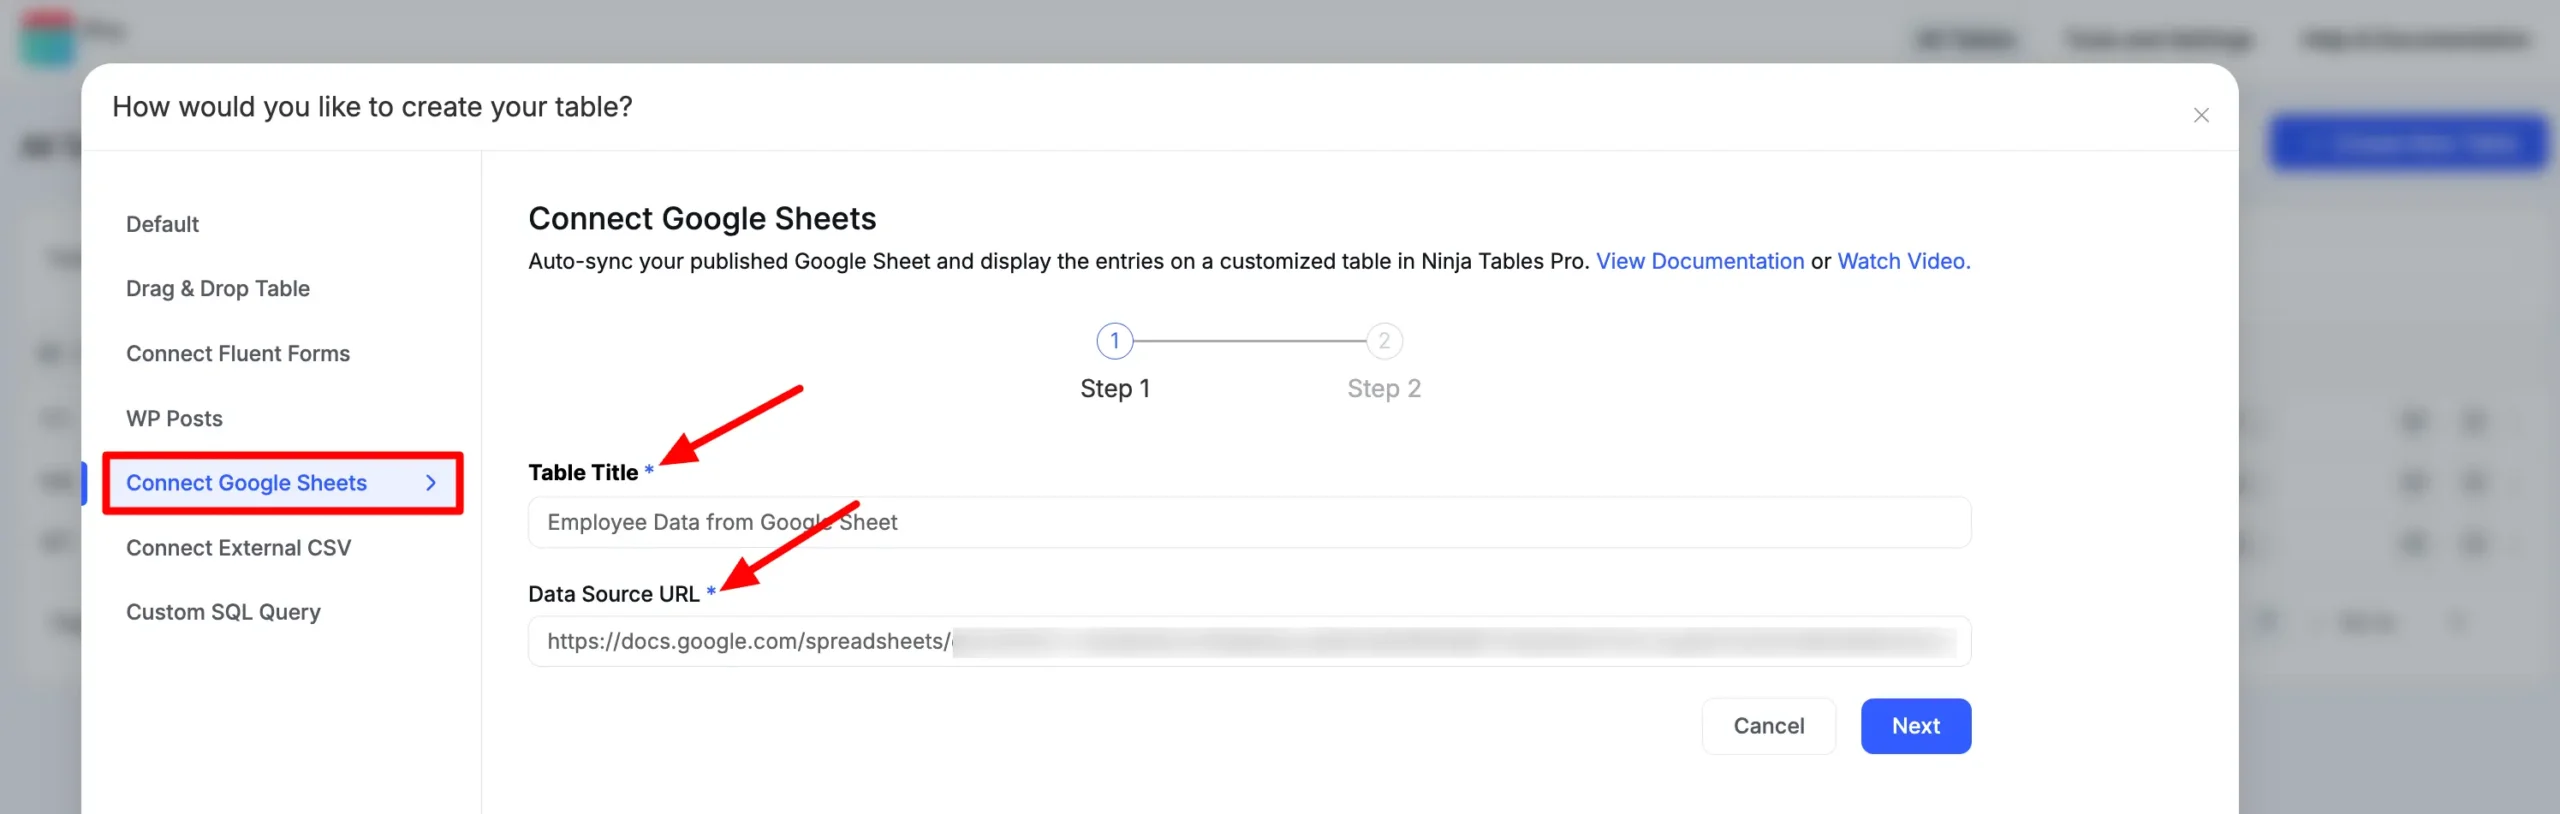
- Then add a name to the table. It could be your Google Sheets name or any other name you want.
- In your Google Sheet, find the File option and then click Publish to the Web in order to get the Data URL.
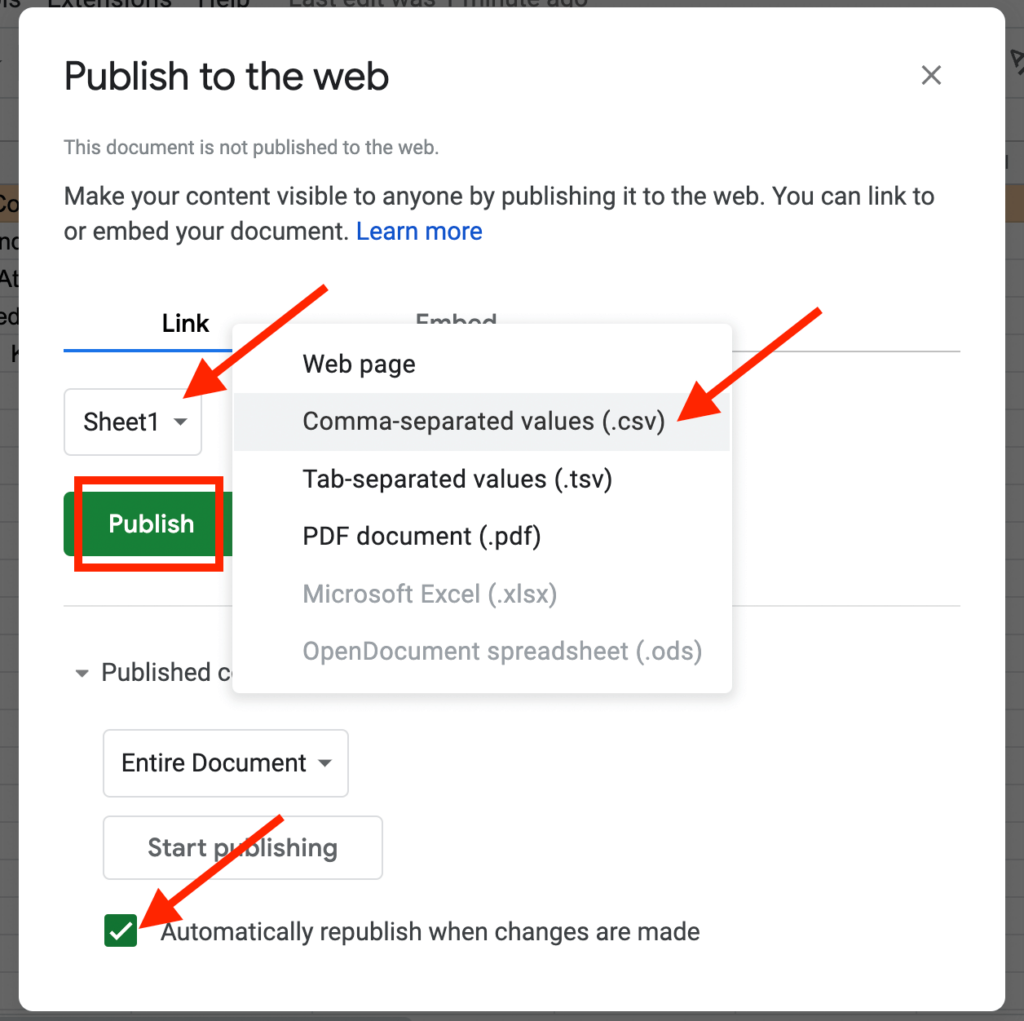
- Choose your predefined sheet in the Section Link. In this example, we are using Sheet 1. Also, select “Comma-Separated Values(CSV)” from the Embed Section, as Google shares its data to the web as CSV.
- Make sure that in the Published content and settings option, the automatically republish when changes are made is checked.
- Then copy the link, go back to the dashboard of your Ninja Tables, and paste it into the Data Source URL. Once you’re done, proceed to the Next button.
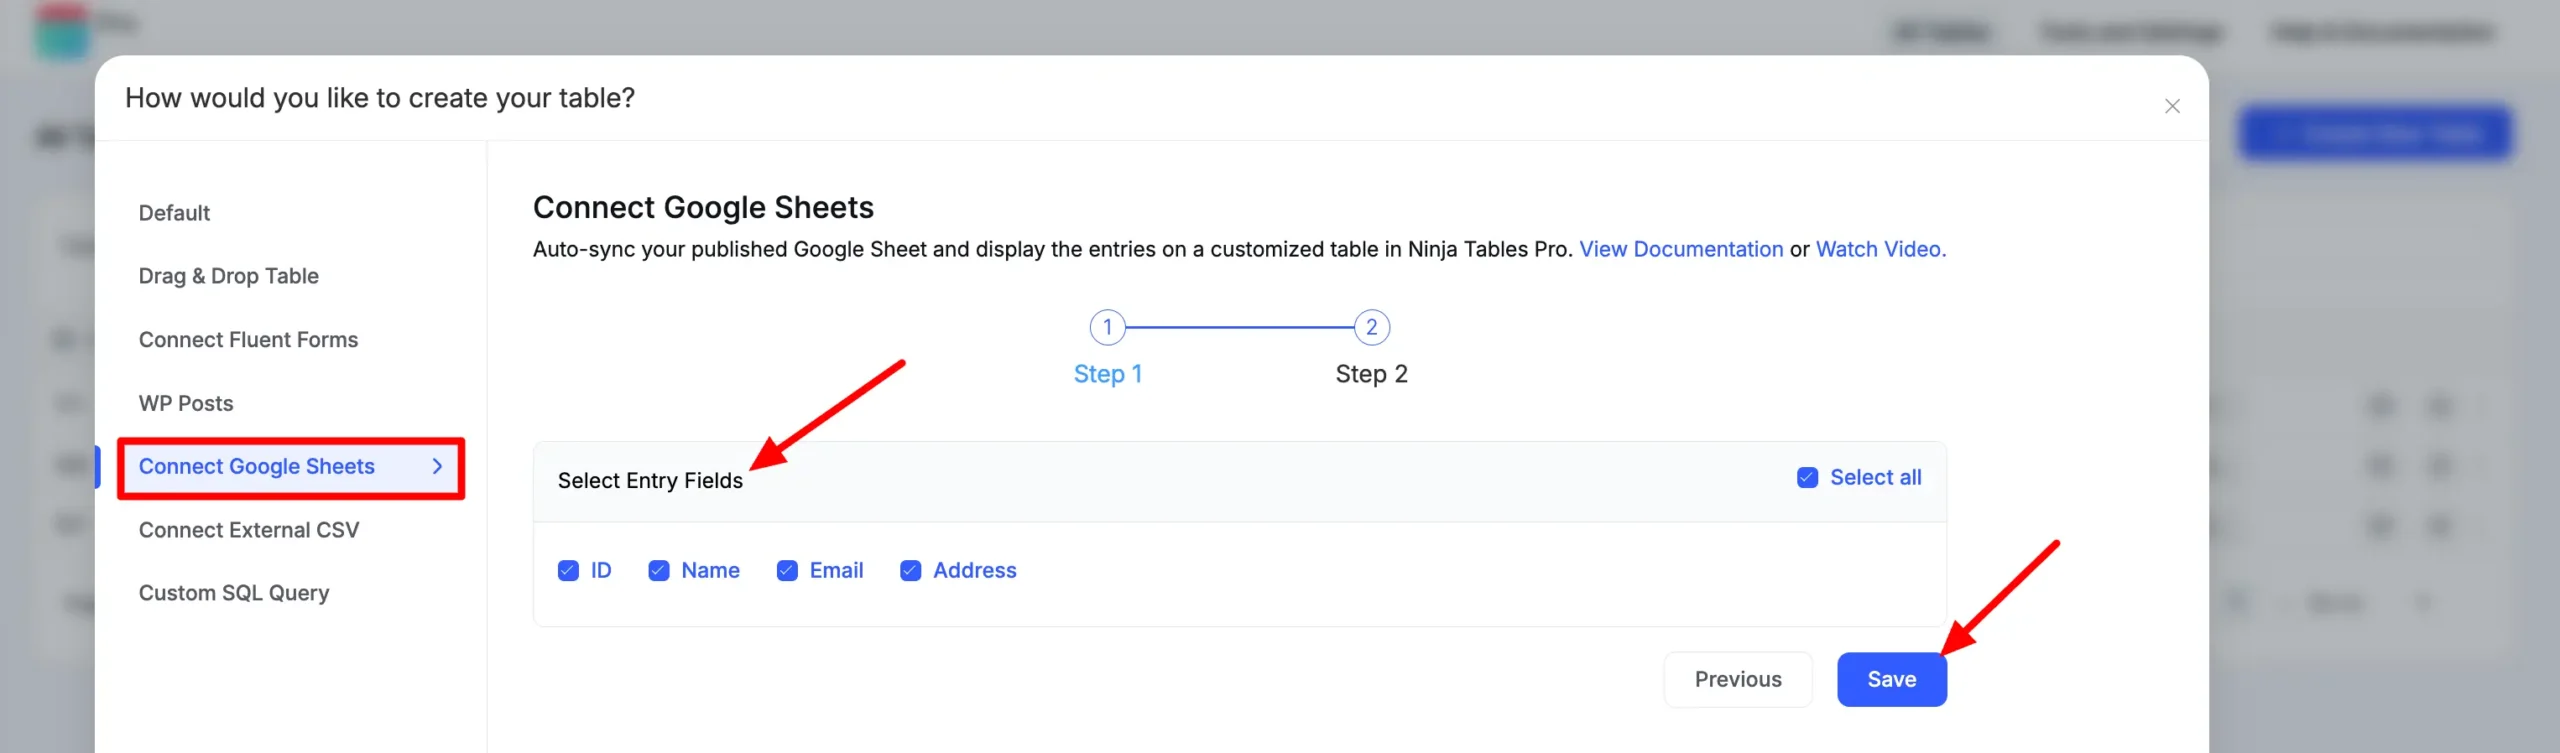
- Choose and save the entry fields you wish to add to. This is how all your data will be imported here automatically.
- Now, go to your Google Sheet again, add some other data here, and check if the modified data is automatically applied to your Ninja Tables.
- However, in this case, after you’re finished adding the details, you have to wait 5 minutes. This is because Google updates the table data cache every 5 minutes. Let’s push forward through the waiting period.
- Go back to your Ninja Tables after 5 minutes, and reload the page. Then at the bottom of the table are the data rows you added 5 minutes ago.
- This is it, the data will also be included in Ninja Tables if someone changes or adds some data to Google Sheets.
Tutorial Video #
Here’s a tutorial video so you can try it yourself.
Import Hyperlinks/Images Automatically #
If your spreadsheet has hyperlinks or images, you can import them directly into Ninja Table so that the link will transform into a clickable link, and the actual image will appear.
Hyperlink: If you have any URL, by default Google will turn them into clickable links until you make them plain text by removing the link inside.
If you want Ninja Table to behave similarly, just change that column’s data type to HTML. It will transform all your hyperlinks into clickable links.
Image: Just import your images into a cell using the Image in Cell option.
Note that, as the data is shared to the web as CSV, which only contains text, any formatting in the sheet will not reflect in the table. But you can do those formatting from Ninja Tables itself.
Moreover, if the spreadsheet contains a column with links in plain text and Image links, use the “Transform Value” feature to turn them into clickable links and viewable Images. See the documentation to learn more about Column Transform Value.
Embed Google Sheet data table in your WordPress post/page effortlessly using Ninja Tables.


Can you import colored cells from Google Sheets into Ninja tables?
You can easily import Google Sheet Tables to your Ninja Tables with its deep Google Sheet Integration. And then you can color your table cells however you want.
Check this blog for better understanding: https://ninjatables.com/how-to-make-a-table-in-google-sheets/
I am not able to receive any data from the Google sheet. Can there be any firewall settings on the server preventing this?
Hi Ulf. This isn’t supposed to happen. Please open a support ticket with details. Our team will try to identify the problem and help you.
can i get data from google sheet but by user email? i have data A, B, C, D, and so on. I want the data only show by any user, by email. can you help me?
Hi Jessy,
Yes, you can get data from google sheet but by user email. Contact our support team for this workaround. Open a support ticket from https://wpmanageninja.com/support-tickets/
Is there a way to choose which tab is shown when the whole Google sheet doc is shared to the web? It only ever seems to pick up the first tab
Hi Stephen, you can choose the tab and sheet when you publish your sheet to the web. Please select your desired tab and publish and then embed the code.
Thank you
I am using pro version and I have a table integrated with Google Sheet. There is dropdown data validation in a column in the sheet.
That’s why it pulls all the lines. Since data is added regularly to this sheet, data validation has to be in the entire column.
How can I prevent rows containing unselectable cells from being drawn?
Hi. Kindly open a support ticket with the table JSON and Google Sheet access. It will be easier this way for your problem to be solved. Our support team will help you.
This weekend, several Ninja Tables on my website linked to Google Sheets all stopped retrieving data, any ideas why this might be?
Hi Paul. Apologies for the delay. What you faced could be a Google database update issue. If this problem still persists, please open a support ticket (https://wpmanageninja.com/support-tickets/#/) so we can help you.
When I select “Save” it just keeps spinning. Is it possible something in my Google Sheet settings is preventing my table from saving?
Hi Sandra. This sounds like a website-specific issue. Please contact your support agent (https://wpmanageninja.com/support-tickets/) if this issue still persist. They will require a temporary admin credential to check it for you. Do let me know if you haven’t received service.
Hola hay forma de publicar una tabla con varias hojas, o siempre se pubica una sola hoja del documento?
¡Hola! Gracias por tu consulta. No es posible publicar una tabla con varias hojas en un solo elemento. Debes crear múltiples tablas para cada hoja del documento. 😊
Is there a way to edit the google sheet link after the table has been created or if you duplicate a table?
Hey Daniel,
Yes, you can easily change the Google Sheet link from your table editor. Just follow these simple steps:
Open the Table Editor.
At the top, you’ll see Edit: You may edit your table settings here. Click on it.
Replace the existing Google Sheet link with your new one, then click Fetch Column.
Finally, click Update Settings to save the changes.
Please note that it may take up to 5 minutes for your Google Sheet data to reflect in the table.
Let me know if you need any further assistance! 😊
Sorry but I can’t find that option
If you created your table with Google Sheet data, this section: “You may edit your table settings here” will be just above the table in your backend.
Probably an odd question, but what if I didn’t want my google sheets to update automatically? Is there a way I could “fetch” the new data from my google sheets on demand. Think of it if a client had to approve the google sheet first, and then I hit “sync” and it feeds to the Ninja Table.
Thanks in advance!
Hi Pete. Thanks for your comment and hey, there’s no such thing called “odd question”! We love to hear what you think!
But unfortunately, while I totally get why you’d want a feature like that, it’s not up to Ninja Tables’ backend. It’s an “Auto-sync with Google Sheets” feature and auto updates the table in 5 minutes when there’s a change in Google Sheets. It won’t affect the sheets if you edit the table data later.
**I will keep your query in mind and see if our engineers can do some tinkering to customize this auto-sync feature. Thanks again!
Can you connect only 1 or 2 columns to Google Sheets ? Or always must be the full table? Thanks !
Hi Joseph,
Thank you for your question!
Yes, you can connect your required columns from Google Sheets if you want.
When setting up the integration, you just need to select only the columns you want to show from the “Edit” section under “Table Rows.”
Alternatively, if you connect the full sheet, you can still hide unwanted columns.
Simply go to the Table Editor, select the columns you want to hide, and set them as “Totally Hidden on All Devices” from the Responsive Breakpoint settings. This way, only the columns you want will be visible on your table.
Let me know if you need any help with the setup!
Hola, es posible exportar datos de Ninja Tables a google sheets además de importar ?
Hola Martin.
No existe una sincronización automática ni una opción integrada para exportar datos de Ninja Tables a Google Sheets. Sin embargo, puedes exportar fácilmente los datos desde la opción “Exportar” de Ninja Tables seleccionando el formato “CSV”. Luego, puedes usar sin problema la opción de importar en Google Sheets para utilizar el archivo CSV exportado.