
Ninja Tables offers you an amazing feature that is CSV Export / Print Button Settings for Frontend. You can enable/disable Print and CSV export settings according to your needs.
Buttons (CSV / Print) is a Pro Feature!
CSV/Print Button in Ninja Tables #
- Clicking the Table Configuration tab, you will find a new window appearing with the Buttons (CSV / Print) option on the sidebar.
- Click on the Buttons (CSV / Print), there a new tab will open with a CSV Export / Print Button Settings for Frontend area.

Now, let’s talk about the details of the Settings area.
CSV Export / Print Button Settings for Frontend #
- To display the CSV Export button or print on the preview table, enable them.
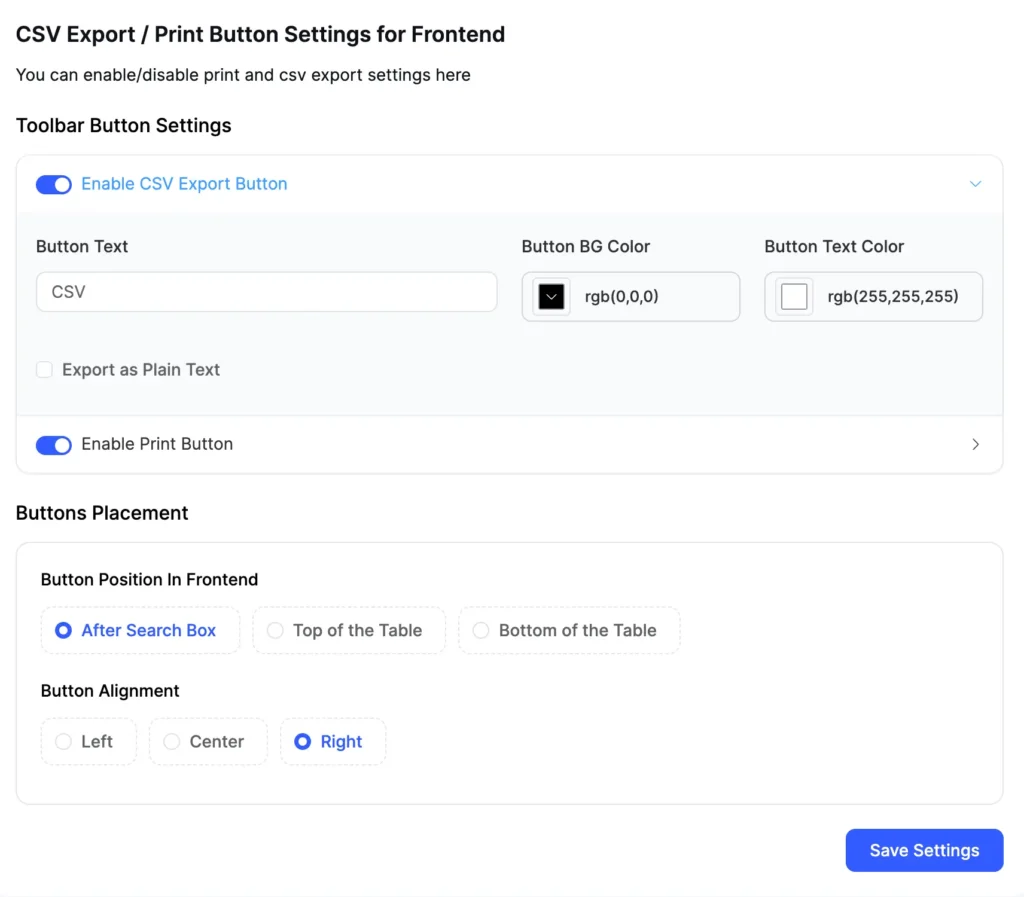
- Some more options will show up after these button has been enabled.
- Button Label: It displays the text you want to appear on the button label, where you can add any text that meets your needs.
- Button Background Color: It reveals the button’s background color.
- Button Text Color: It displays the button’s text color.
- Export as Plain Text: Your button will export as plain text if you enable this.
Print Button Settings #
- To display the Print button on the preview table, enable the Print Button Settings.
- Some options will show up after the Print button has been selected.
- Button Label: It displays the text you want to appear on the button label, where you can add any text that meets your needs.
- Button Background Color: It reveals the button’s background color.
- Button Text Color: It displays the button’s text color.
- Print Screen Header: If you choose Yes to include a header on each page in the Print Screen Header option and enter the header text in the HTML content box below, the header text of each page will be displayed once you press the Print button.
- Print Screen Footer: In the Print Screen Footer option, if you select Yes to the Footer on each page and enter the text for the footer in the HTML content section below, each page’s footer will be displayed once you press the Print button.
Buttons Position #
You can adjust the position of your button to suit your requirements. Your button can be placed in one of three places: After the search box, Before the table, or at the Bottom of the table.
Buttons Alignment #
Your buttons’ alignment can be changed as needed. The button alignment has three options: Left, Center, and Right.
When you are done with the configuration, don’t forget to click on the Update Settings button. Let’s see the Preview Table after you complete the settings.
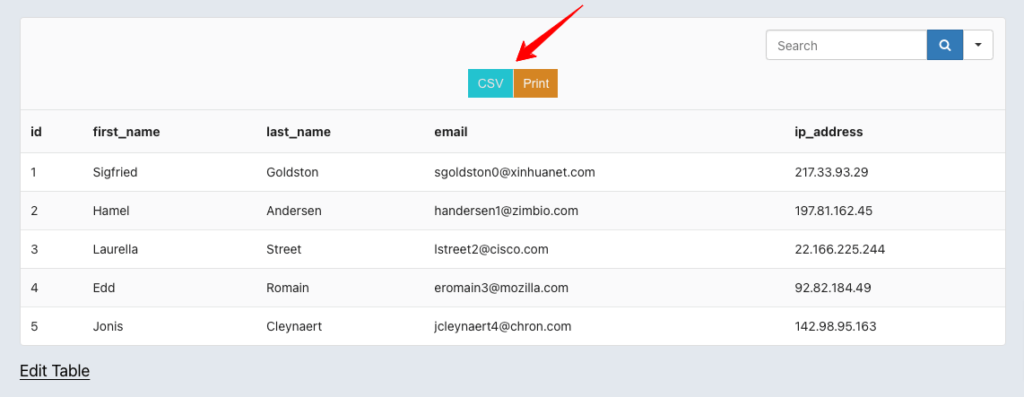
A CSV file will be downloaded when you click on the CSV button and several printing options will appear if you click the Print button.
This is how you can quickly use and style your CSV and Print buttons to match your needs.


I would love to be able to show/hide this button similar to the “Edit” button, by Role.
Hi Phil. Thanks for your comment. As for your query, you can hide/show the button with some custom coding. There’s no default option for this.